Game Courier Developer's Guide
Game Courier is a versatile web-based system for playing Chess variants on-line. It can automatically generate the boards used for most variants, and it can handle the rest by using predrawn graphic files. It can automate complex moves, and it can be programmed to enforce the rules of games. It is an open-ended system that can be made to support almost any Chess variant, but it still takes human effort to design and program the presets it uses for the games it supports. This guide describes how to design and program games for Game Courier. If all you want to do is play games that have already been made available for Game Courier, you don't need to know anything in this guide. But if you want to do anything from customizing an existing preset to designing and programming new presets from scratch, this guide tells you how.
The material in this guide is presented roughly in order of difficulty. It begins with information useful for casual users who just wish to change the appearance of a preset, and it ends with information for power users who wish to design and program their own presets. Most users won't need to go beyond the material in the first section. Also, you may want to gradually go through the sections, taking time to master each one before moving on.
- Definitions
- Customizing a Preset
- Editing a Game
- Composing a Fairy Chess Problem
- Creating a Piece Set
- Making Boards
- GAME Code -- Game Courier's programming language
Definitions
Let's start by introducing some of the basic terminology surrounding Game Courier. This will help you better understand this guide when I start explaining how to do things.
- Preset
- A modification to Game Courier's default values, provided through a form or a query string.
- Settings File
- A file on the website that specifies details for a particular game by changing what count as default values.
- Customization
- A preset that changes the appearance of a game that has already been defined in a settings file.
Preset
By default, Game Courier simulates a Chess board, allowing two people to play Chess (or any game using the same equipment) without any rule enforcement, using a piece set of my own design. Go to play.php to see what this looks like.
To play other games with Game Courier, or to change the appearance of the board it displays, all you have to do is change some of its default values. This is done by passing form data to the script that provides new values for some of the variables Game Courier uses to construct a board. This can be done in one of two ways.
Here is an example of using a form to pass new values to some of Game Courier's variables. This will change the name of the game, expand the board to ten columns, and change the setup and piece set.
| HTML | Try It |
|---|---|
<FORM ACTION="http://play.chessvariants.com/pbm/play.php"> <INPUT TYPE="submit" NAME="game" VALUE="Univers Chess"> <INPUT TYPE="hidden" NAME="cols" VALUE=10> <INPUT TYPE="hidden" NAME="code" VALUE="rbnmqkanbr/pppppppppp/****/PPPPPPPPPP/RBNMQKANBR"> <INPUT TYPE="hidden" NAME="set" VALUE="magnetic"> </FORM> |
If you look at the URL for the page, it looks like this:
This shows how form data can be passed through a query string in an URL.
The passing of form data to Game Courier to change some of its default values is called a preset. You have just seen two ways of posting a preset to a webpage. You may write it as a form, or you may write it as an URL with a query string. The form method is most appropriate when you change many values or want to provide options. To avoid a long query string when using a form, you may add the METHOD=POST attribute to the form, like so:
| HTML | Try It |
|---|---|
Settings File
Another way to change the default values is to change what the defaults are. Instead of changing the variables directly, a settings file changes the values of the $default array, which Game Courier uses to store default values in. Using the same example of Univers Chess, here is what the same changes to the defaults look like as a settings file:
<?php
$author = 'fergus';
$default['code'] = <<<'NOW'
rbnmqkanbr/pppppppppp/****/PPPPPPPPPP/RBNMQKANBR
NOW;
$default['cols'] = <<<'NOW'
10
NOW;
$default['game'] = <<<'NOW'
Univers Chess
NOW;
$default['set'] = <<<'NOW'
magnetic
NOW;
?>
|
As you may notice, this is a series of variable assignments in nowdoc format. This format allows quotation marks to appear in a string without being escaped. Many older settings files use the heredoc format, which might be less secure but hasn't proven to be a problem. You should notice that $author is the only variable that is set aside from elements of $default. This is because there is no default value for $author, and this value is mainly used to keep other people from overwriting a settings file. A settings file is stored on the website, and putting changes to the default values into a settings file allows us to write much shorter presets, using only the name of the game and the name of the settings file as the parameters of the query string or form. For example, this settings file is saved under the name of sample, and it can be accessed with the following query string:
http://play.chessvariants.com/pbm/play.php?game=Univers+Chess&settings=sample
Now a lot more can be done with a settings file than just the few things I have changed in this example. The following link uses the official settings file for this game, and it includes more.
http://play.chessvariants.com/pbm/play.php?game=Univers+Chess&settings=default
To show you what this larger settings file looks like, you can view a syntax highlighted copy of its PHP code with the showsource.php script. Give it the name of a game and of a settings file, and it will display the contents of the settings file for you.
http://play.chessvariants.com/pbmsettings/showsource.php?game=Univers+Chess&settings=default
Customization
A customization is a preset that includes modifications to the default values defined in a settings file. For example:
http://play.chessvariants.com/pbm/play.php?game=Univers+Chess&settings=default&set=alfaerie
In this example, I have specified a particular settings file. This settings file uses the magnetic set by default, but I have added the assignment "set=alfaerie". So, this preset will now display pieces with the alfaerie set.
The purpose behind using customizations is to save you work and keep things more organized. The alternative to customizing a settings file is to clone a settings file and modify it to appear different. This is a very bad idea, because a clone does not inherit future changes to the original settings file, and if the original needs to be changed, the clone could get out of date. By making one settings file and providing customizations of it, all the customizations inherit changes to the original settings file, and all you have to edit if you fix anything is that one file.
Moreover, if all you want to do is change the appearance of a game someone else has provided a settings file for, it can be an even worse idea to clone and modify it, since the author of the original file would not even be able to update your clone. But if you just make a customization, it will inherit any changes the original author makes to the original settings file.
Look at the page for the programmed version of Chess for an example of several customizations of the same settings file. If you look at the source code for that page, you will see that they all use a settings file called default, but each one (except the first) changes some parameters. You will also notice several buttons under each. Putting one of the changeable parameters in a submit button allows the same form to offer different options.
Customizing a Settings File
There is no distinction between customizing a preset and editing one, since the only way to modify a preset is to make a new preset. This is because presets are not named and saved, and the only way to change one is to change its values. But settings files are named and saved, and this allows you to use the same settings file with different presets. With this in mind, Game Courier makes it easy for you to make customizations of a particular settings file with its Customize mode. To use it, go to the main menu for a particular game with a settings file, such as the Univers Chess example given above, and click on its button. This is will bring you to a form that lets you change parameters that affect the game's appearance. These same parameters can be edited in Edit mode, and they are described there under the heading of Appearance. Although you could use Edit mode to modify clones of settings files, there are three reasons for using the Customize mode instead:
- A customized preset will inherit any future bug fixes and improvements made to the original settings file, but a cloned preset will not. This is the most important reason of all. If you didn't program the original preset, you don't want to create one you won't be able to maintain. If you did program the original preset, it will be easier to maintain if you create only one and provide additional graphic options by customizing it.
- Customize mode protects you from making mistakes by not allowing you to change anything you shouldn't.
- Fewer options makes it less confusing for the average user.
Editing a Game
To edit a game, you need to change the default values Game Courier uses to represent a game. You should already know that you can change these with a query string or with a form. But you don't have to hand write your own query strings and forms to get Game Courier to play other games. Game Courier has an Edit mode that allows you to change default values and to routinely see the results of your changes. For any particular game, you can reach Edit mode by clicking on the button in its main menu. If you haven't done so already, go to one of the settings files linked above, and click on this button. This mode provides you with a form that is divided into five main sections:
- Identification
- The section where you identify the game, the settings file, and yourself.
- Structure
- The place for defining the coordinate system and the initial placement of pieces.
- Appearance
- Settings that affect the appearance of the game. These should be mostly user-configurable and have no bearing on gameplay.
- Written Rules
- A brief statement of the rules as a reference for players.
- Code
- Code in the GAME Code language for automating aspects of moves (such as castling or en passant) or for enforcing rules.
Identification
In this section, you identify the game, the settings file, and yourself. Here are detailed descriptions of each field.
Game
This field specifies the name of the game the preset is for. This name will be displayed at various places in Game Courier. It will also be translated into a game ID that will be used for locating logs, settings files, and minirules files. The game ID is made by converting all capitals to lowercase, by converting all high ASCII (8-bit) characters into the closest equivalent low ASCII (7-bit) characters, and all spaces into underscores. The name you use here should use proper capitalization, and it should separate words with spaces. This is not the place for giving your preset a distinctive name. Nothing but the game's name should go here.
Rules URL
This field specifies a webpage where a user may go to read the rules of the game. This will usually be to one of the webpages of our main website, the Chess Variant Pages. Any of these pages may be entered without including the domain. Start the name with the slash that follows the domain name. For example, the default value is "/d.chess/chess.html", which refers to http://www.chessvariants.com/d.chess/chess.html. Note that this beginning slash is important. Without it, it would be interpreted as a relative URL pointing to http://play.chessvariants.com/pbm/d.chess/chess.html, but there is no webpage there. Yet if you want to refer to a page in the play.chessvariants.com subdomain, then this is the thing to do. Just enter the URL relative to the http://play.chessvariants.com/pbm/ directory. For example,"../erf/MiniChss.html" would point to the page at http://play.chessvariants.com/erf/MiniChss.html. If the webpage is offsite, then you must enter the full URL, including the http:// part at the beginning.
Settings
This field is for the basename of a settings file. The extension for the filename will be ".php", but this will be added automatically. This file will be found in a subdirectory whose name is based on the name of the game. Thus, it isn't important to include the game's name in the settings file name. Together, this basename and the game's name specify a specific settings file. When this file already exists, Game Courier will use the defaults listed in it for its default values. When you click on the "Save" button, you can create or overwrite this file. If you enter an unused value in this field without saving a settings value, it will have no effect.
This field is not required, because you can distribute a preset as an URL or a form, but it is recommended. If you do not enter a name for a settings file, games that use your preset will not inherit any fixes you make to it later. If you do any programming of games, it will be a very good idea to save your work to a settings file. This will allow games already using it to inherit fixes, and it will allow for the distribution of customizations that inherit the structure and code of the main version.
Redirect
When you have written a new settings file for a game that makes an old one obsolete, but games have been played with the old one that will not work with the new settings file, whether because you changed the setup or changed how notation works, the right way to handle this situation is to deprecate the old settings file. You can do this by redirecting any new invitations to the new settings file while leaving the old one around for viewing the games played with it. So, to deprecate an obsolete settings file, use this field to name the settings file to redirect new invitations to. Note that the name of the game must remain the same, since a particular settings file gets identified by the combination of its name and the game's name.
Userid
This field is for your userid. This needs to be filled in whenever you save a settings file. Each settings file stores the userid of its author so that only its original author may make any changes to it. You may not overwrite an existing settings file unless you are its original author, which you can confirm by entering your userid and password.
Password
This field is for your password. This field is required whenever you save a settings file. You can save a settings file only when you enter the correct password for your userid.
Structure
The single-most important part of defining a game is its structure. This includes its coordinate system, the initial placement of pieces, and how many players there are. Game Courier uses the coordinate system and the positions of pieces to mathematically model the game, so that it has knowledge of the playing area and the pieces. It needs to know how many players there are to know who to pass the next turn to. Currently, Game Courier supports only two-player games, but I hope to change that in time.
Game Courier keeps track of the board position with an array called $space. This is an associative array that keeps track of what the spaces are called and what is on each space. The key of each element is the coordinate of a particular space, and the value of each element is a label representing what is on the space. This label can be @ to represent an empty space, - to represent a deleted space, or a letter or longer string representing a particular piece.
Instead of asking you to enter the $space array directly, Game Courier calculates it from the values of some other fields. Here are the fields that define the structure of a game:
FEN Code
Game Courier had its genesis when I realized that I could use Forsythe-Edwards Notation to represent the positions of variants with different pieces and boards than Chess. Forsythe-Edwards notation is a method of representing the position on a Chess board with a compact string. The initial idea was to pass along URLs with modified FEN strings as moves were made in a game, and this would enable players to see the position on the computer screen. Nowadays, Game Courier stores moves in a log and freshly calculates each position from the moves made. But it still uses the FEN string to represent the initial position.
Game Courier represents the board with a variation of Forsythe-Edwards Notation that has been modified for use with variants. This notation was invented in 1883 by David Forsythe, chess editor of the Glasgow Weekly Herald, for the purpose of concisely recording positions in chess. It assumed the standard 8x8 board, and it consisted of letters, numbers, and slashes. As a whole, the notation described each position in a left-to-right, top-to-bottom order from White's perspective. This is the same direction that we read English in. Each letter represented a piece, each number a series of empty spaces, and each slash indicated the end of a rank. It used lowercase letters for Black and uppercase for White. Using this code, the opening position in Chess would look like this: "rnbqkbnr/pppppppp/8/8/8/8/PPPPPPPP/RNBQKBNR". Game Courier's version takes some inspiration from Hans Boedlander's Fairy Forsythe-Edwards Notation, but it is not the same.
Game Courier's extended version of Forsythe-Edwards Notation works with all types of boards, not just 8x8 square Chess boards. The coordinates of most boards are represented by ranks and files. These may not always be at right angles to each other, but that is irrelevant to the use of this notation to represent positions. No matter what labels are used for ranks and files, all ranks and files are represented internally by integer array indexes, beginning with zero. So, on a Chess board a1 is internally (0,0), and h8 is internally (7,7). Given this, the Forsythe code begins by describing the highest ranked position in file 0. This is the top left space on a rectangular board. This would be (0,7) or a8 on a Chess board. A little trial and error will tell you where it is on any unusually shaped board. It then continues to describe the board one rank at a time until it finishes with rank 0. It uses the Max Columns parameter to know how long a rank should be. This code may represent any number of spaces, and the number of ranks is a function of the number of spaces divided by the length of a rank. With the use of the minus sign, which represents non-space, it is possible to create non-rectangular boards by cutting out any unused spaces. A minus sign is used just like a piece label but has a different function. For the custom shape, which does not use ranks and files, the Forsythe code represents pieces in the order that the positions were listed. With a custom board, cutting out spaces isn't necessary, because you can omit a space simply by not creating it.
Game Courier's expanded FEN code also allows for pieces besides those in Chess. The 52 ASCII characters that represent the letters of the alphabet are reserved for identifying pieces. Lowercase letters are normally used for Black pieces, while uppercase letters are normally used for White pieces. Longer labels may be used by enclosing them in braces, like so: {NB}. When the board is rendered as an ASCII diagram, the labels themselves are used in the diagram. But for graphic boards, the labels are used to identify piece images stored on the website. Which images are used depends on the set that has been selected. Each set has a file that tells which image to use for each label. A variety of sets are offered, because there are different designs of the same pieces available, because there are more than 26 pieces used in Chess variants, because the same letter is sometimes appropriate for different pieces, and because many were made back when only individual letters could be used to represent pieces.
The remaining modifications to FEN code simply make it easier to read and write. The asterisk (*) fills the remainder of a rank with empty spaces. This is most useful for designating empty ranks. The slash (/) has become optional, and when it comes before the natural end of a rank, it fills the remainder of the rank with non-space. Note that the asterisk and the slash differ on more than what they fill the rest of the rank with. When an asterisk appears at the natural end of a rank, it starts a new rank, while the slash does not. Thus, "****" and "*/*/*/*/" are equivalent to each other, but "////" and "/*/*/*/*" are not equivalent to each other.
Here is a summary of the characters used in the FEN Code:
- Any letter, typically [a-z] and [A-Z]
- Each letter represents an individual Chess piece. Lowercase letters normally represent Black pieces, and uppercase letters normally represent White pieces.
- Any base 10 number
- A number represents a series of as many empty spaces.
- The minus sign: -
- A minus sign, or hyphen, represents a place in the board definition where there is no actual space. This could be a hole in the board or extra space around a non-rectangular board.
- The slash: /
- A slash represents the end of a rank. When it comes at the natural end of a rank, it serves mainly as a visual cue for someone reading the code. When it comes earlier, the rest of the rank gets padded with hyphens (representing non-existing spaces).
- The asterisk: *
- An asterisk fills the remainder of a rank with empty spaces.
- The opening brace: {
- Indicates the beginning of a label.
- The closing brace: }
- Indicates the end of a label.
With this in mind, here are some alternate ways of representing the opening position in Chess:
- rnbqkbnrpppppppp32PPPPPPPPRNBQKBNR
- This is the most compact way to represent it. The number 32 represents the four ranks between the Black and White Pawns.
- rnbqkbnr/pppppppp/8/8/8/8/PPPPPPPP/RNBQKBNR
- This way is less compact but more legible. It visually divides the code into all eight ranks.
- rnbqkbnr/pppppppp/****/PPPPPPPP/RNBQKBNR
- In this one, each asterisk represent an entire rank of empty spaces.
- rnbqkbnr/pppppppp/*/*/*/*/PPPPPPPP/RNBQKBNR
- Some might prefer this one to the one above it, but I don't.
Columns
This specifies how many files wide the board will be. This value is used when parsing the FEN Code used for representing the board.
Files
This specifies what labels to use for the files. In this context, a file is a vertical column of spaces on a chess board. All labels must be separated by single spaces. A label may be a string of any length. The empty string is an acceptable label for a file that won't have any spaces in it. The first label will be used for the leftmost file from the first player's perspective, what is normally the a file in Chess. Labels will be assigned to files in left-to-right order. When this field is left unset, which is what you'll want to do for most games, the default behavior will be to start with a lowercase a and go through the alphabet to a lowercase z. All labels are case sensitive, and if you want any capital or numeric labels for files, or if your game requires more than 26 files, you will have to enter them in this field.
Besides regular labels, you may enter a null label by entering two spaces side by side. Since every space is parsed as a separator, two adjacent spaces will be understood to have a null string between them. A null label is used for a rank or file that is not actually used for actual spaces on the board. It is useful for separating areas of the board from each other. One special type of label is the invisible label. When you precede a label name with an exclamation point, !, some methods of rendering the board will refrain from displaying its label. An invisible label is used for spaces that will be used in the game without the players ever having to specify coordinates of those spaces. This can happen when moving pieces to and from certain spaces is handled only by automation or the * operator. For example, in Shogi, the file labels for the off-board areas have been made invisible. When a player does try to explicitly specify an invisible coordinate, the move will be treated as illegal.
The value of this field is used for every board shape except the Custom shape.
Ranks
This specifies what labels to use for ranks. All labels must be separated by single spaces. A label may be a string of any length. The empty string is an acceptable label for a rank that won't have any spaces in it. Null labels and invisible labels can both be used. These have already been described in the previous section on the Files parameter. The first label listed in this field will be used for the bottommost rank from the first player's perspective, what is normally the first rank in Chess. Labels will be assigned to ranks in bottom-to-top order. When this field is left unset, which is what you'll want to do for most games, the default behavior will be to use arabic decimal numerals, starting with 1 and counting up for each successive rank. All labels are case sensitive, and if you want any alphabetic labels for ranks, you will have to enter them in this field.
The value of this field is used for every board shape except the Custom shape.
Checker Pattern
Several rendering methods for particular shapes can automatically generate boards according to a specified pattern for checkering the board. It is this pattern that is stored in this field. The variable underlying this field is called $board, because it seemed like a good idea at the time, but it is more accurately described as a checker pattern.
I originally put this one under Appearance, but I decided to move it to Structure for two reasons. First, the value of this field does not need to be changed in a customization. Second, the color operator in the GAME Code language will return the color value of a space, and although this is not important information in most games, a game could be designed that uses the colors of spaces as important structural information about the game.
Here is how the Checker Pattern works. Each digit in this pattern represents one of the colors or patterns listed in the Colors or Patterns field. Patterns is used for ASCII diagrams, Colors for everything else. 0 is for the first color or pattern, 1 for the second, and so on up to 9. The pattern begins at the left end of the top rank, going across one rank at a time. It follows the same path as the FEN code, described earlier. The period marks the end of a rank. When it reaches a period before it reaches the end of the rank it is on, it repeats the same pattern for the rest of the rank. If it reaches the end of the whole pattern before it reaches the end of the whole board, it repeats the whole pattern as needed. Thus, something as simple as "10.01." works for Chess and most other variants. An occasional variant will use a different or more complex pattern. Hexagonal Chess uses a three-color pattern that covers three ranks before repeating, and Chessgi, which includes a holding area for captured pieces on each side of the board, uses a pattern that describes the first two ranks in full. The normal behavior is to draw no borders around spaces, letting only the different colors of spaces distinguish them from each other. But when this parameter is set to "1.", borders will be drawn around spaces for the square-table combination.
Sides
This specifies the names of the sides. The default for this is "White Black". Since all names must be separated by single spaces, spaces may not be used in the names. At present, only two-player games are supported. So only the first two names will be used. The first name is for the side that moves first, and the second name is for the side that moves second. You will normally want to leave this field unchanged unless your game uses different names for the two sides, such as Red and Blue, or has Black move first, as Shogi does.
Appearance
How a game is displayed to a player is not a critical part of what Game Courier needs to know to interpret moves, calculate new positions, or enforce rules. The appearance of a game is for the benefit of the players, and it should be user-configurable to allow players to play with sets and boards they are personally comfortable with. When you create a preset, you should define a default appearance for the game. You may then use Customize mode to provide other customizations of the preset that keep the same settings file but use different graphics. Players may alter most of the same fields to their personal preferences in ongoing games. This will affect only what a particular player sees and not what the other player sees.
- Shape
- Rendering Method
- Set Group
- Set
- Custom Sets
- Background
- Colors
- Patterns
- Font
- Point Size
- Scale
- JPG Quality
- Border Color
- Text Color
- Border Size
- Exclude Pieces not in Setup
Shape
This field controls the shape of the cells or the board. While shape normally has an effect on what kind of movement is allowed across the board, it has no bearing on how the program internally models the game. It could display a Chess board as a circle or as a rhombus of hexagons, and it wouldn't make a bit of difference to how Game Courier understands the game. The shape parameter is provided for the benefit of human players, who normally expect certain games to use certain shapes.
But because shape does have a bearing on the rules, customization of shape is not allowed unless the shape is square or custom grid. These two shapes are interchangeable for the same games. The main difference between them is that the square shape tells Game Courier to draw a board from scratch, and the custom grid shape tells Game Courier to draw the board using a pre-existing graphic image.
Game Courier handles boards with the following shapes:
- Square Cells
- Horizontal Hexagonal Cells
- Vertical Hexagonal Cells
- Circular Boards
- Custom Grids
- Custom Boards
The first five shapes cover most kinds of boards, and the last shape covers all the rest. The first five all use standard file/rank coordinates, which are represented by a file label immediately followed by a rank label, such as a1 or e4. These are the standard algebraic type of coordinates used in Chess. How this is done for boards whose cells are not rectangular is described further below. Unlike the other shapes, the Custom Board shape lets you individually specify coordinates without any underlying two-dimensional file/rank axis. This makes it useful for 3D games and for very strange boards.
Square Cells
Most variants will use the square cell shape. When this shape is specified, each space will be the same shape and size, a square, or at least a rectangle, whose dimensions are determined by the $height and $width variables. These are normally set to 50, but they may be changed in files for individual piece sets. This allows the size of the cells to be based on the size of the pieces. This shape uses standard file/rank coordinates. Files are vertical lines of spaces, and ranks are horizontal lines of spaces. The boards made with this shape may be of varying shapes and dimensions. This shape only constricts the shape and size of individual spaces.
The spaces drawn for square-celled boards will be colored according to a Checkering pattern, described further below. Unless it is drawn in ASCII, its spaces will be drawn in solid colors listed in the Colors field.
Horizontal Hexagons
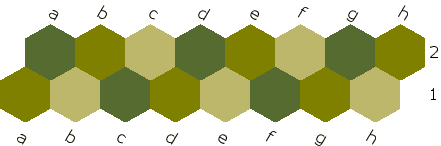
Horizontal hexagons are standard equilateral hexagons that naturally align along the horizontal axis. These cells have a point at the top and bottom, with vertical flat sides on the left and right. Game Courier identifies their coordinates by means of slanting files that go from the lower left to the upper right and horizontal ranks. Coordinates are given in standard file/rank format. Note that each new rank begins half a space to the right of the previous rank. Thus, a full board will be shaped like a parallelogram. For a board that is shaped like a hexagon, which is common for hexagonal chess games, various spaces must be cut out.
See Hex Shogi 91 for an example.
Vertical Hexagons
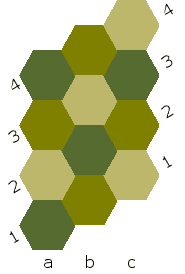
Vertical hexagons are standard equilateral hexagons that naturally stack vertically. These cells have flat sides on the top and bottom and points on the left and right sides. Game Courier recognizes their coordinates by means of vertical files and slanting ranks that go from the lower left to the upper right. Coordinates are given in standard file/rank format. Note that each new file begins half a space above the bottom of the previous file. Thus, a full board will be shaped like a parallelogram, and various spaces must be cut out to shape the board like a hexagon, which is a common board shape for hexagonal chess variants.
See Glinski's Hexagonal Chess for an example.
Circular Boards
Circular boards are distinguished by the shape of the board, not the shape of the cells. Instead of using cartesian coordinates, circular boards use polar coordinates. Cartesian coordinates place points on an x/y axis. Hexagonal boards merely shifted the angle between the axes. Polar coordinates distinguish a point by its angle and distance from the center. On a circular board, Game Courier distinguishes ranks by their distance from the center, and it distinguishes files by their angle. In other words, each ring of spaces counts as a rank, and each pie slice of spaces counts as a file. Because there is no good place to place rank markers on a circular board, Game Courier normally just writes file markers. Game Courier's usual convention is to number the innermost ring as rank 1, counting out from the inside. So, the higher the rank number, the further away it is from the center. Circular boards are automatically generated by the PNG, GIF and JPG methods, and the CSS method supports circular boards when an appropriate graphic image is used.
See Circular Chess for an example.
Custom Grids
A custom grid can be used for square boards, hexagonal boards, triangular boards, and more. It can do any of these by letting you adjust the x and y intervals between ranks and files. It does these with two fields. These are Nextfile and Nextrank. Each takes at least two numeric values. By default, Nextfile is "50 0" and Nextrank is "0 50". These defaults create a board checkered with squares whose sides are 50 pixels in length. The first number is the x interval, and the second is the y interval. For square boards, a change in file changes only the x value, and a change in rank changes only the y value. But other kinds of boards change both values for either rank or file changes. For example, values of "50 25" for Nextfile and "0 50" for Nextrank can create a vertical hexagonal board.
Nextfile and Nextrank can also take more than two values, though each must always take an even number of values. When more than two values are given, the first pair is used first, then it uses each subsequent pair in turn until it goes through them all, then it repeats. Because of this, a triangular board can be done with values of "50 25 50 -25" for Nextfile and "0 50" for Nextrank. Even more complicated boards can be handled with longer strings of values.
Note that the values of Nextfile and Nextrank presume a value of (0,0) for the first space in the first rank, which is by default a1. Values for Nextfile and Nextrank should normally be positive, though negative values are also acceptable. The dimensions of the board are calculated to find the size of the box used to contain the board, and positions in the container are readjusted for negative positions.
See Chinese Chess for an example.
Custom Boards
A custom board lets you use any board you can draw a computer image of. It is the most versatile way to design any board you like, but it is also the most tedious way to make a board. So it should be used only for boards you can't do any other way. It works by taking a list that associates board coordinates with pixel coordinates. This is filled into a TEXTAREA box, and each association of coordinates should have its own line. Here's a short example:
The first word in each line should be a board coordinate. It doesn't have to be in the usual coordinate form. It may be any kind of label. The second word is the x position, and the third word is the y position. These should all be positive, and (0,0) should be understood to lie at the top left corner. This is the same point that is used as the origin for graphic images. When you enter pixel coordinates, it will often help to look at the image in a graphics program that can tell you the coordinates of wherever you point the mouse. The coordinates you enter should belong to the top left corner of the space, or if it's not rectangular, the top left corner of the rectangle the piece will be displayed in. Don't worry about centering your pieces. The PBM will read the dimensions of each piece and center pieces automatically.
When using the Custom shape, the PBM does not make use of the usual rank and file coordinate system. It ignores any values given to the Ranks, Files, and Columns fields. The Forsythe code uses the order in which you define the positions, and it determines the dimensions of the container from the dimensions of the background image. So, unlike some shapes, the custom shape does not allow the use of tiled images.
See Crazy 38's for an example.
Rendering Method
Boards may be drawn in a variety of ways.
Before describing these in detail, let me mention that the combination of shape and rendering method determines exactly how a board is drawn. This table indicates the available combinations and what they do.
| ASCII | Table | CSS | PNG, GIF or JPG | |
|---|---|---|---|---|
| Square | Draws ASCII diagram | Generates board from scratch as HTML table | Generates board from scratch with CSS Grid | Generates board from scratch; draws as image |
| Horizontal Hexagonal | Uses external background image for board | |||
| Vertical Hexagonal | ||||
| Circular | ||||
| Custom Grid | Uses background image for board, or generates board from tile image | |||
| Custom | Uses background image for board | |||
PNG, JPG, or GIF Image
Each of these methods renders a board as a graphic image file, making use of an AREA MAP and the USEMAP attribute of the IMG tag to click on and move individual pieces. These are the most versatile of any methods, and they share some of the same pros and cons:
| Pros | Cons |
|
|
|---|
They function almost identically, using much of the same code, differing only in the file format used for the generated image.
PNG Images
If you're using a modern browser with a fast broadband connection, this will normally be your best choice. The PNG format was created to replace GIF at a time when the patent on GIF hindered the development of free software for creating GIF images. It is generally superior to GIF, because it can support true color images and has better compression for small-pallette images.
| Pros | Cons |
|
|
|---|
JPG Images
If you're short on bandwidth but want to use resized or true color images, the JPG format may your best choice.
| Pros | Cons |
|
|
|---|
Unlike the GIF and PNG methods, this method supports the use of the Quality field, which should be set to a value between 1 and 100. This is the quality at which a JPG image gets saved. A lower quality results in a smaller filesize but also in more image distortion. The default of 75 is usually a good balance between filesize and image distortion.
GIF Images
The GIF format supports small-palette images of no more than 256 colors. It is good for images that don't make use of true color graphics and don't need to be resized. Resized images will be reduced to 256 colors and dithered to minimize distortion, but the result will usually be larger than a resized JPG file. The GIF format is supported by every graphical web browser. The main reason to use GIF is if your browser does not support PNG. Unless you are using an antique browser, it is unlikely that you lack PNG support.
| Pros | Cons |
|
|
|---|
CSS Code
This method makes use of Cascading Style Sheets. Known by the abbreviation CSS, this is available on any modern web browser, including, but by no means limited to, Firefox, Chrome, Safari, Opera, Edge, and Vivaldi. If this method uses a background image for the board, it positions pieces by means of absolute positioning. This background image may constitute the entire board or be a tiled pattern that gets repeated for boards of various dimensions. If this method uses the square shape, it will render the board with CSS Grid.
| Pros | Cons |
|
|
|---|
HTML Table
This method renders boards as HTML tables. It works only with the square shape, representing each space with a table cell.
| Pros | Cons |
|---|---|
|
|
ASCII Art
This method draws ASCII diagrams. It can be used for square boards and both types of hexagonal board, but it cannot be used with custom grids or custom coordinates. The only reason for having this method is that it is the only one to work with any browser. It is usually unnecessary to choose this option in a preset, since Game Courier will automatically draw diagrams as ASCII art whenever it detects that someone is using the Lynx browser, which is the main text-based web browser in use. Although you probably won't ever need to make a preset using this method, it can come in handy when you want to generate an ASCII diagram for displaying on a web page. You can think of this method as the equivalent of figlet for Chess variant diagrams.
| Pros | Cons |
|---|---|
|
|
Set Group
This changes the sets that appear in the Set dropdown menu. Various sets have been grouped together by compatibility with each other. These are sets that normally associate the same letters with the same pieces, differing only in piece design. Some sets are unique and so don't belong to any group. To select one of these sets, you should first use this to display all sets in the Sets menu.
Set
This allows you to select a different set of pieces. Your choice will usually be limited to other sets within the same group. These are sets that are compatible with each other. When you're just customizing a preset, you will probably want a piece set that is compatible with the original set. In that case, you should limit yourself to the choices within the original set's group. But you might sometimes have a reason to choose a different set. In that case, you can use the Set Group menu to change the sets listed by the Sets menu.
Custom Sets
Here you may define custom sets. A custom set is one that lets you specify which pieces it uses and sometimes other details. In many cases, you will not need a custom set, as Game Courier already provides various predefined sets, and you may find some that match your game. But in case none of the available sets has all the pieces in your game, or you have used H. G. Muller's Wizard for generating GAME Code, or you have uploaded your own pieces images that are not part of any set, you may want to enter a custom set in this field.
While the section on Creating a Piece Set describes how to create sets as a series of variable assignments in PHP, that method is useful only if you get your sets uploaded. To include a custom set within the definition of a particular game, you should write it out as a single multi-dimensional array in JSON, which is a simple, transparent method for exchanging data that is supported by multiple programming languages.
You should surround each level of the array with left and right braces. At the top level of the array, you should associate the name of the custom set with a nested array that gives values for some variables. The variable name goes on the left, followed by a colon, and the value goes on the right. Both the variable name and its value should be enclosed in quotation marks, and each variable/value pair should be separated by commas. Here is an example:
{
	"custom": {
		"dir": "/graphics.dir/motif/",
		"pieces": {
			"P": "WPawn.gif", "p": "WPawn.gif",
			"N": "WKnight.gif", "n": "WKnight.gif",
			"B": "WBishop.gif", "b": "WBishop.gif",
			"R": "WRook.gif", "r": "WRook.gif",
			"Q": "WQueen.gif", "q": "WQueen.gif",
			"K": "WKing.gif", "k": "WKing.gif"
		}
	}
}
In this example, custom is the name of the set, dir is the directory the images may be found in, and pieces is a set of associations between notation and image file names. The names available for custom sets are custom, custom-abstract-gif, custom-alfaerie-gif, custom-alfaerie-png, custom-alfaerie-png35, custom-alfaerie-svg, custom-greenwade-svg, custom-magnetic-gif, and custom-motif-gif. In case I create any more, you will find them all in the Custom group in Edit mode, and each set description will have a tooltip giving the set name. Of these, the set called custom is the most versatile. With it, you should be able to set any value that sometimes gets set in a set file. Here is a listing and explanation of each value:
- dir
- The directory that files may be found in. This should be a relative path beginning with "/" for the root of the website. It does not stricly have to be a directory, but it has to be a string that when concatenated with the file name will name a local file on our website.
- pieces
- An associate array that uses piece notation as its keys and image file names as its values. The image file names do not have to be strictly file names, but they must be strings that when concatenated with the value of dir will name a local file on our website.
- flip
- A Boolean flag indicating whether to switch the piece sets when the orientation of the board is from the second player's perspective. This is useful for games like Shogi that distinguish pieces by orientation instead of color. If there is a flipped array available, as described below, it will use the value from that instead of just switching the pieces used for each side.
- flipped
- An associative array like the pieces array that defines the images to be used for pieces when the board's orientation is flipped. This is useful for games like Shogi, which distinguish pieces by orientation rather than by color. For most games, it is unnecessary. If you define a flipped set, flip will be automatically set to true.
- width and height
- The width and height of the board spaces. These will default to 50px if you don't set them.
- originalblack and originalwhite
- The actual color of the black pieces and of the white pieces, defined as a hexidecimal RGB color. This is needed to know which color to recolor when recoloring pieces.
- defaultblack and defaultwhite
- What color to color the black pieces and the white pieces when the player has not specified a preference. These should also be in an RGB hexadecimal format. As long as these are different values, it is possible to use the same piece images for both sides and just color them differently. This is commonly being done for .svg images, which have been provided in only one color.
- setdesc
- A written description of the set to be displayed on the page when the set is in use.
The other custom sets are finetuned for images from a certain location, and they have most values already set to what they should be. To help you avoid listing the wrong file names when using them, they all follow the three-part naming convention of custom, then the piece style, then the file type. Generally, the only value you will have to provide for one of these is pieces. While they are a bit easier to use than custom, I have provided them mainly for the purpose of providing players a choice between different piece sets. Here is an example of defining multiple sets:
{
	"custom-abstract-gif": {
		"pieces": {
			"P": "WPawn.gif", "p": "WPawn.gif",
			"N": "WKnight.gif", "n": "WKnight.gif",
			"B": "WBishop.gif", "b": "WBishop.gif",
			"R": "WRook.gif", "r": "WRook.gif",
			"Q": "WQueen.gif", "q": "WQueen.gif",
			"K": "WKing.gif", "k": "WKing.gif"
		}
	},
	"custom-alfaerie-png": {
		"pieces": {
			"P": "wpawn.png", "p": "wpawn.png",
			"N": "wknight.png", "n": "wknight.png",
			"B": "wbishop.png", "b": "wbishop.png",
			"R": "wrook.png", "r": "wrook.png",
			"Q": "wqueen.png", "q": "wqueen.png",
			"K": "wking.png", "k": "wking.png"
		}
	},
	"custom-magnetic-gif": {
		"pieces": {
			"P": "WPawn.gif", "p": "WPawn.gif",
			"N": "WKnight.gif", "n": "WKnight.gif",
			"B": "WBishop.gif", "b": "WBishop.gif",
			"R": "WRook.gif", "r": "WRook.gif",
			"Q": "WQueen.gif", "q": "WQueen.gif",
			"K": "WKing.gif", "k": "WKing.gif"
		}
	},
	"custom-motif-gif": {
		"pieces": {
			"P": "WPawn.gif", "p": "WPawn.gif",
			"N": "WKnight.gif", "n": "WKnight.gif",
			"B": "WBishop.gif", "b": "WBishop.gif",
			"R": "WRook.gif", "r": "WRook.gif",
			"Q": "WQueen.gif", "q": "WQueen.gif",
			"K": "WKing.gif", "k": "WKing.gif"
		}
	}
}
Note that a comma separates each set definition, and that the custom-alfaerie-png set uses different file names. This is because its file names are lowercase rather than mixed case, and it has PNG images instead of GIF images.
See Also: Creating a Piece Set
Background
Background images are used with the CSS, PNG, GIF and JPG methods. All available background images are stored in the same directory, and the menu for this field lists all of them except for those used only for displaying the board from the second player's perspective. Most background images are symmetrical and will do for both players, but some are asymmetrical, such that one is used for the first player's perspective, and another one is used for the second player's perspective. To avoid confusion, the only background images made available for you to select from are those that will work for the first player.
Some background images are designed for tiling, and some display the entire board. Tiled background images may be used to generate boards of varying dimensions.
Your choice of background image affects the width and height of spaces. These are normally determined by which piece set you choose, but when you choose a background image, its values for width and height override other values. If you upload any new images to the backgrounds/ directory, you should contact me (Fergus Duniho) if its cell dimensions are not the default of 50 pixels by 50 pixels or if two asymmetrical images need to be paired together.
Colors
This lists up to ten colors that may be used for automatically generating boards with the Table, GIF, PNG, or JPG methods. Which colors are used where is determined by the Checker Pattern, described above. These colors may be entered in hexadecimal format or by name.
Patterns
This lists up to ten patterns that get used for drawing ASCII diagrams. Each pattern must be a single ASCII character, and there should be no separation between them. Which patterns are used where is determined by the Checker Pattern, described above.
Font
This menu selects the font used for coordinates. The font selections match fonts stored on the server, which the GIF, PNG, and JPG methods use when generating board images. The script can read these fonts, but they're in a location you can't download them from. Some of the fonts are freely available from other websites, and some come from CD-ROMs I own. The Table and CSS methods make use of fontlists to select a font from your computer. These fontlists will begin with the font named, sometimes include some lookalikes, and end with a generic font-family, such as serif or sans-serif.
In selecting the fonts, I tried to represent various standard types of fonts, I selected legible and good-looking fonts, and I sought out various regional, historical, and display fonts that would suit certain games or certain themes common to many variants. The available fonts are shown below by category. The images seen here are not stored on the server. They are generated on the fly by a script that reads the fonts.
Serif
Transitional
Alice, designed for reading Lewis Carroll
Libre Baskerville, a free Baskerville clone
Literata, designed by Google for ereading; the main serif font used on this site
Slab Serif
Typewriter
Sans-Serif
Grotesque/Gothic
Geometric
Humanist
Computer/Legibility
Optical Character Recognition B
Standard Microsoft font
Display
Historical/Fantasy
Show Business
Miscellaneous
Foreign
Point Size
This lets you choose the point size of the font used for coordinates and ASCII art. The default value is 12.
Scale
This is a percentage value of the scale to render a board at. The default value is 100, which doesn't change the size at all. Lower values decrease the size, and higher values increase the size. The method used for scaling depends on the rendering method. The GIF, PNG, or JPG methods resize the image they create. This is best for scaling down to smaller boards, because it uses anti-aliasing to preserve the image quality, and it reduces bandwidth by using smaller images. The Table method changes the WIDTH and HEIGHT values of table cells and piece images. The CSS method modifies CSS to resize the board, and it changes the WIDTH and HEIGHT values for piece images. These two are both good for scaling a board up to a larger size, because they save bandwidth by letting you cache and reuse graphics without using larger images for larger boards, and not as much image quality is lost when increasing the size as is lost when decreasing it. Finally, the ASCII method scales the board by changing the font size used for the ASCII art.
JPG Quality
This is a percentage value between 0 and 100 for the quality of an auto-generated JPG image. Reducing the quality reduces the filesize, which reduces download time. The default is 75, which is commonly the default that graphic programs use when saving JPG files. It is best to play around with this value to see what gives a good filesize without starting to look bad.
Max Colors
The maximum number of colors allowed in a GIF or PNG image. Since the GIF format is limited to 256 colors, any value above 256 affects only PNG images. For any value above 256, a PNG image is treated as true color, and how much the value is above 256 makes no difference. This value has no effect on JPG images, which are always true color.
Border Color
This specifies the color of the border placed around the board when autogenerating it. It may be entered as a hexadecimal color code or by name. This color is also used for highlighting the spaces a piece may legally move to when a player touches or clicks on a piece. For details on how to make a game display legal moves, see the tutorial How to Make Your Game Display Legal Moves in Game Courier.
Text Color
This specifies the color of the text used for coordinates. It may be entered as a hexadecimal color code or by name.
Border Size
This specifies the minimum width and height of the border placed around the board when autogenerating it. It is measured in pixels.
Exclude Pieces not in Setup
Setting this checkbox will cause the display of pieces at the bottom of the page to leave out any pieces from the piece set that are not used in the Forsythe code used for representing the game's opening position. This helps decrease download time by not downloading unnecessary images, and it makes the display less confusing. But it is not appropriate for all games. When, for example, pieces may promote to pieces not found in the opening position, this should be left unchecked.
Written Rules
This is where you can enter a brief prose description of the rules as a reference for the players. Besides describing the rules, you may mention details about the preset, such as how it is programmed (or not programmed) to behave, and what players may need to know about entering notation. But save details about the game's history or strategy for the main page on it. You may use HTML, but not JavaScript or PHP.
To help you display pieces using the current piece set, I have provided a shortcode called [pc]. It should be placed within square brackets, and it normally takes a piece label as a parameter. For example, [pc K] would display the image of the White King using the currently selected piece set. If a player changed the piece set, the image would change with it. This helps you match the images in your description of the game with the images used in Game Courier's display of the game. This shortcode can also take a name parameter, and it may include a description between opening and closing shortcode tags. For example, [pc K King]The King may move one space in any direction but cannot move into check.[/pc] will display the name of the piece underneath its image and place the description to the side of the image.
In case you would like to provide rules in different languages, I have provided a [lang] shortcode. This takes one parameter, the two-letter code for a language (see List of ISO 639-1 codes), and text should be placed between an opening tag with the parameter and a closing tag. Here's an example:
[lang en]This text is in English.[/en]
[lang de]Dieser Text ist in deutscher Sprache.[/lang]
[lang fr]Ce texte est en Français.[/lang]
[lang el]Είναι τα Ελληνικά μου.[/lang]
This shortcode identifies what language the enclosed text is written in, and when multiple bodies of text are written in different languages, it consults the browser's HTTP_ACCEPT_LANGUAGE environment variable to determine which language to display. If one of the languages appears in this variable, it will display text in the language most favored by this variable. When there is no match, it will display text from the first language provided by the author. In this case, that would be English.
So, it is a good idea to place text in your native language, which you would be most proficient in, first.Programming
When you make a game available in Game Courier, you may want it to automate certain moves, enforce legal moves, display legal moves, or recognize when someone has won. All of this can be done by writing code in the GAME Code language, described further on. This is a server-side, interpreted language I designed for letting anyone program games on this site without being able to use it to hack the site. Code may be entered in seven different fields, described below. Whenever a move is made, Game Courier constructs and runs a program made from the code in these fields.
- Pre-Game
- Pre-Move1
- Pre-Move2
- Post-Move1
- Post-Move2
- Post-Game1
- Post-Game2
- Bypass Error Check on Piece Label
Pre-Game Code
This code gets evaluated once at the beginning of the game before anyone moves. It is the appropriate place for code that randomly places pieces, as in Fischer Random Chess, for initializing variables and , for defining functions and subroutines, and for including include files.
Pre-Move 1 Code
This code gets evaluated right before the move entered by the first player each time the first player moves. In the presets I've written, this field has often gone unused, but it sometimes has its uses.
Pre-Move 2 Code
This code gets evaluated right before the move entered by the second player each time the second player moves. In the presets I've written, this field has often gone unused, but it sometimes has its uses.
Post-Move 1 Code
This code gets evaluated immediately after each move made by the first player. It is the appropriate place for code that checks the legality of a move.
Post-Move 2 Code
This code gets evaluated immediately after each move made by the second player. It is the appropriate place for code that checks the legality of a move.
Post-Game1
This code gets evaluated after all moves and all post-move code has been evaluated. It will be evaluated only when the last move made so far was made by the first player. It is the appropriate place for code that checks for check, checkmate, and stalemate or other win/draw conditions. This is because the code for this is usually too time-consuming to run after every move. It is also the right place for code that populates an array of legal moves for displaying legal moves when the second player clicks on a piece.
Post-Game2
This code gets evaluated after all moves and all post-move code has been evaluated. It will be evaluated only when the last move made so far was made by the second player or when no players have moved yet. It is the appropriate place for code that checks for check, checkmate, and stalemate or other win/draw conditions. This is because the code for this is usually too time-consuming to run after every move. It is also the right place for code that populates an array of legal moves for displaying legal moves when the first player clicks on a piece.
Bypass Error Check on Piece Label
By default, Game Courier makes sure that the piece label you specified for a piece matches the piece you are moving. For example, it will allow "N b1-c3" as a first move in Chess, but it will not allow "B b1-c3", because the piece at b1 is a Knight, not a Bishop. While this behavior is appropriate for most games, some games need it turned off in order to distinguish between different legal moves. For example, in Fusion Chess, a simple piece may separate from and move away from a compound piece. So if a Queen is on d1 with an open file, "Q d1-d4" and "R d1-d4" would both be legal moves. This checkbox should be set only when you will use code that distinguishes between legal moves such as these and will take different actions depending on which move has been entered.
Composing a Fairy Chess Problem
You can compose problems for any of the Chess variants you can play on Game Courier, and the problems you compose will be listed in the Problems index. To start, find a game and click the Compose button. You can do this from the main preset for a game or from a position in a game you are viewing a log of. This will bring you to the problem composer. Here, you can change the board position, set the stipulation for the problem, describe it, select whose turn it is, and enter a solution. You can change the board position by entering new FEN code or by moving pieces manually. You can move pieces with the mouse or enter commands for moving pieces. Once you have the position you want, have entered the stipulation and who should move, you should enter the solution. Click on the Move button when no fields have been changed. This will bring you to where you can enter the solution by moving pieces. Once you have finished the solution, click the Compose button to go back to the problem composer, and from there enter your userid and password if need be and click the Publish button. This will store your problem on the website, and it will be accessible from this page.
Creating a Piece Set
A piece set is made from a set of images in a common folder and a PHP file that sets up an array for associating letters with piece images. Each image should be a GIF, PNG, or SVG file with a transparent background. For GIFs and PNGs, the color of the background should be #00FF00. The transparent background is required for the Table and CSS rendering methods, which both display the actual piece images in the web browser. The green background is required for the GIF, PNG and JPG rendering methods, which both make this color transparent when copying piece images into the single image being generated. The use of this particular color for backgrounds is a convention, chosen to ease conversion of graphics created for Zillions of Games, which happens to use the same convention.
When creating a new set, you do not have to create new pieces. You might just create a PHP file that picks out a new selection of the pieces already available. But if you do make your own pieces, have an editor upload them to the site. As a general policy, I won't have set files pointing to off-site graphics. You should also have an editor upload your set file to the sets subdirectory. And whoever does the uploading, you should contact me, Fergus Duniho, to have the set listed in the sets.php file so that Game Courier has access to it.
Here is an example of what a set file looks like:
<?
$dir = "/graphics.dir/japshogi/";

$pieces = array(
	"B" => "flip/Bishop.gif", "b" => "Bishop.gif",
	"D" => "flip/RookP.gif", "d" => "RookP.gif",
	"G" => "flip/Gold.gif", "g" => "Gold.gif",
	"H" => "flip/BishopP.gif", "h" => "BishopP.gif",
	"K" => "flip/WKing.gif", "k" => "BKing.gif",
	"L" => "flip/Lance.gif", "l" => "Lance.gif",
	"M" => "flip/LanceP.gif", "m" => "LanceP.gif",
	"N" => "flip/Knight.gif", "n" => "Knight.gif",
	"P" => "flip/Pawn.gif", "p" => "Pawn.gif",
	"R" => "flip/Rook.gif", "r" => "Rook.gif",
	"S" => "flip/Silver.gif", "s" => "Silver.gif",
	"T" => "flip/PawnP.gif", "t" => "PawnP.gif",
	"V" => "flip/SilverP.gif", "v" => "SilverP.gif",
	"Y" => "flip/KnightP.gif", "y" => "KnightP.gif",
	"Z" => "flip/Kamikaze.gif", "z" => "Kamikaze.gif"
);

$flipped = array (
	"K" => "WKing.gif", "k" => "flip/BKing.gif"
);

if (($shape == "square") || ($shape == "grid")) {
	$width=42;
	$height=45;
}
else {
	$width = 52;
	$height = 52;
}
$flip = true;
?>
In this example, $dir indicates the directory where all the images can be found. Lowercase letters are assigned to Black pieces, and uppercase letters are assigned to White pieces. Individual letters or longer names may be used for this. The $width and $height variables indicate the dimensions for the spaces. These normally default to 50 and usually don't need to be set here, but the Shogi pieces were smaller than the default pieces. To accomodate hexagonal boards, different values have been given for nonsquare shapes. When the $flip variable is set to true, as it is here, it indicates that piece sets should be switched when the board is flipped. It is set to true here, because these pieces are distinguished by orientation rather than by color. The default is for it to be false, and for most piece sets, it does not need to be set in the piece set definition files. When it is true, a $flipped array will be used, and it will be automatically generated from the $pieces array by switching the values for lowercase and uppercase keys. When exceptions to this procedure are required, they should be made in the set file by partially defining the $flipped array ahead of time. This was done here, because in this set, the two Kings are distinguished by appearance as well as by orientation. If you happened to use longer names and did not use all lowercase for one side and all uppercase for the other, you may have to define a full $flipped array in the set file.
Making Boards
Although Game Courier can automatically generate boards for many games, it can't generate boards for all games. Also, you may prefer something more beautiful than the simple small-palette boards generated by Game Courier. The CSS, GIF, PNG, and JPG methods can make use of background images for boards. If there isn't already a suitable background image available, you will need to make your own. That's what this section is about.
The first thing you will need is an image editor. While I do still use and recommend Ultimate Paint, it is no longer being developed, and it frequently crashes. Other editors you may check out include Paint.net and GIMP. Whatever editor you use, it should let you create GIF, PNG, and JPG files, which are the three acceptable file types for images on web pages.
This guide won't tell you how to use a graphics program. But I will describe some general techniques for designing boards. One is to first display your pieces against some tiling background image. This is to find out exactly where Game Courier will be placing the pieces on the board. If you take a screenshot of the display, you can load it into your graphics program and use it as a guide for positioning the spaces. While this is not so important for square boards, it can really come in handy for circular or hexagonal boards, not to mention boards of even more unusual designs.
You can use textures in place of solid colors by pasting solid color patterns over images of textures, then cutting them out and pasting them on your board in the right place. This is how I have created various boards with wood and marble backgrounds.
If you want to control how coordinates are displayed on your board, make two boards. Put the coordinates from White's perspective on one board, and put them from Black's perspective on the other board. Then have your preset use both boards, a different one for each player. Doing so will cause Game Courier to not display any coordinate labels, leaving only your predrawn coordinate labels.
GAME Code
When Game Courier calculates how moves change the board position, it does so by constructing and running a computer program written in a language designed specifically for Game Courier. This language began as a set of commands for automating tedious or special tasks, such as rotating the board for Motorotor, handling captured and dropped pieces for Shogi, or rolling dice for Vegas Fun Chess. Over time, it evolved into a full-fledged programming language that can be used for enforcing the rules of games. It is named in the Procrustean manner of starting with an acronym and finding words to fit. So GAME Code is an acronymic name for Game Courier's Automation, Management, and Enforcement Code. The main influences on GAME Code are PHP, BASIC, and the Zillions of Games language. It is written in PHP, it is an interpreted language with a structure very similar to BASIC, and it is designed for some of the same purposes as the Zillions of Games language.
To calculate how the moves of the game change the original position, Game Courier constructs and interprets a program written in the GAME Code language. Note that you will never write a full GAME code program yourself. You will just write parts that it will put together into a complete program for the sake of evaluating moves and determining the board position. At the bare minimum, this program consists of a series of moves, and such a program will just change the position of pieces on the board. But it can be programmed to do more. With the GAME Code language, you can write code that runs at the beginning of the game, at the end, and before or after each move. Code run at the beginning goes in the Pre-Game field. This is typically used for setting flags and variables and for defining functions and subroutines that will be used later. It is also where you include files, which may contain code intended for use with multiple games. The code for included files will be appended to the end of the program after the end command. Code for evaluating the legality of a move typically goes either before or after each move is made. There are Pre-Move and Post-move fields for this. My own practice is to use the Post-Move fields to evaluate a move after it has been made. This allows the use of special variables that give information about the move to be evaluated. For most games I've programmed, I've left the Pre-Move fields blank. But they sometimes have their uses. Code for determining whether anyone has won yet typically goes at the end. There are two Post-Game fields for this, one for each player, so that it may run different code depending on who the last player to move was.
Code appearing before or after the game appears at the main level of the program. Moves also appear at the main level. Code run before or after each move is encapsulated in a subroutine. Before each move, it adds a line that sets the variable mln to the index of the mline array with the original move in it. This is useful when you want to access the actual text of the move with the thismove built-in function. This is useful for multi-move variants whose parts need to be separated and individually evaluated, but for most games, moves can be evaluated by checking the value of variables set after the move is made. Here is a basic outline of what a Game CODE program looks like:
pre-game code
sub preauto1:
	code
endsub;
sub preauto2:
	code
endsub
sub postauto1:
	code
endsub
sub postauto2:
	code
endsub
gosub preauto1;
White's first move
moveindex 3;
gosub postauto1;
gosub preauto2;
moveindex 5;
Black's first move
gosub postauto2;
This portion from gosub preauto1 to gosub postauto2 may repeat with some variation for more moves.
post-game code
end
included code
For a more detailed example, look here.
The GAME Code language has evolved in two directions. One is as a functional programming language similar to Lisp, and the other is as an imperative language similar to C and BASIC. The functional part of the language is used for evaluating expressions, and the imperative part is used for enforcing rules and updating the board and pieces. The main features of the language are divided into the following sections:
- Comments
- Game Commands
- Input and Revision Commands
- Output Commands
- Variables
- Arrays
- Flags
- Constants
- System Variables
- Expressions
- Control Structures
- Including Files
- Restricting User Input
- Functions and Subroutines
- Optimization
- Debugging
- Tutorials
- Learn by Example
In case it helps you learn the language better, you may also examine some of the PHP source code behind the GAME Code language:
Game Commands
These commands manipulate the gaming environment, particularly piece positions and board shape. They are presented first, because they are useful even when nothing else of GAME Code is used.
- add P [all|any] C1 ... C2
- Adds piece P to designated spaces, whether already occupied or not.
- add P C
- Adds piece P to the space at coordinate C
- add P all C1 ... Cn
- Adds piece P to every designated space.
- add P any C1 ... Cn
- Adds piece P to randomly selected space from among designated spaces.
- alias A1 P1|C1 ...
- Sets one or more aliases for piece and coordinate labels. Each odd argument should be an alias, and each following argument should be the actual internal representation of a piece or coordinate. You should not define multiple aliases for the same piece or coordinate, and you should not use the same alias for multiple pieces or coordinates. Setting an alias allows it to be used in a move in place of the actual internal representation, and it causes the alias to show up in tooltip text over spaces on the board, to be used when listing available pieces, and to be used in tooltip text for displaying pieces in minirules files that use the showpiece function. An alias is replaced by its internal representation during line parsing. Note that an alias may be used only with moves that use the - operator or the * operator, i.e. typical player input, and an alias should not include either of these operators or the semicolon, though it may include other punctuation. When a line gets interpreted as a command, aliases are ignored. So any code for enforcing rules should still make use of the internal representations of pieces and spaces. The alias command is intended only for improving the user interface, not for changing how presets get programmed. If you use this command to allow special names for certain spaces, it is best to use a custom image for your board that has the coordinates you want players to see. Although the alias command will affect tooltip text for individual spaces, it will not affect how rank and file labels get displayed.
- capture C1 ... Cn
- Captures pieces at listed coordinates. Saves last piece captured.
- change C P1 ... Pn
- Searches through the list of pieces for the piece at coordinate C. If it finds it, it converts it to the next piece in the list. If a piece in the list should not change, just follow it with itself. If coordinate C is given as "dest", the last position moved to is used. Useful for demoting captured pieces in Mortal Chessgi or Mortal Shogi.
- clear [board]
- Removes all pieces from board. Useful when composing a fairy chess problem.
- convert C P1 P2 ... Pn-1 Pn
- Searches for the first pair of pieces whose first member matches the piece at coordinate C. If it finds it, it converts it to the next piece in the list, which will be the next piece in the same pair. If coordinate C is given as "dest", the last position moved to is used. Useful for demoting captured pieces in Shogi.
- copy C1 C2
- Copies the piece at C1 to C2. Leaves C1 unchanged.
- delete C1 ... Cn
- Deletes the listed spaces from the board. This does not simply empty a space. It removes a space from the board, changing the board shape. Useful with Wormhole Chess.
- drawn
- Indicates that the game is drawn and ends the game.
- drop P [all|any|first|last|left|right] C1 ... Cn
- Drops piece P onto an empty space or onto all empty spaces from among the coordinates listed after the subcommand. It differs from add by not dropping a piece onto occupied spaces. Here are the subcommands:
- all
- Drops the piece onto every empty space among the listed spaces.
- any
- Drops the piece onto a single randomly selected empty space among the listed spaces.
- first
- Drops the piece on the first empty space listed in the series. Since "drop first" is normally used for automating the capture of pieces in Shogi-like games, its first use determines the spaces that will be searched by the * operator for dropping pieces.
- last
- Drops the piece on the last empty space listed in the series. Since "drop last" is normally used for automating the capture of pieces in Shogi-like games, its first use determines the spaces that will be searched by the * operator for dropping pieces.
- left
- Drops the piece on a randomly selected empty space from among those between the first space listed and the first occupied space.
- right
- Drops the piece on a randomly selected empty space from among those between the last space listed and the last occupied space.
- empty all
- empty C1 ... Cn
- With the all keyword, it empties every space of the board. This is useful before setting up a fairy chess problem. With a list of coordinates, it empties each listed space. Like capture but doesn't record last captured piece.
- flip C1 ... Cn
- flip array
- Flips which side a piece belongs to at each listed coordinate. The first coordinate may be "dest" for the last space moved to. If the first argument is an array, it will assume it has an array of coordinates and flip each piece on those coordinates.
- link direction-name (C1 C2 ...) ...
- Adds the named logical direction to specified spaces on the logical map of the board. It takes a series of coordinates, each in a pair of parentheses. For each coordinate except the last, it assigns the direction name to the following coordinate. A series must be at least a pair of coordinate, but it can be more. For example,
link n (a1 a2 a3 a4 a5 a6 a7 a8)defines the direction of n for all the coordinates in the a file of a chessboard. Direction names are not symmetrical, because that would be kind of stupid. This is similar to how Zillions of Games does the same kind of thing. See map below for further details on logical directions. To reuse mostly the same code for the opposite direction, see rlink. - lost
- Indicates that the current side has lost and ends the game.
- map direction-name y x ...
- Adds a named logical direction to the logical map of the board. For each space on the board, it identifies the space in the direction named as the space that is y files and x ranks away. This is similar to how Zillions of Games defines directions, but the origin for Game Courier is in the lower left, not the upper left, as it is for Zillions of Games. So positive x values go up and negative x values go down. Positive y values go right, and negative y values go left. The logical map is used with the built-in functions logleap and logride, which determine whether a piece can make a leap or a ride using logical directions.
- map direction-name space-separated logical directions
- Maps new logical directions by calculating where a series of logical directions would take a space from each piece. This is useful for completing the logical directions after creating some.
- map direction-name-1 (space-separated logical directions-1) ... direction-name-n (space-separated logical directions-n);
- Like what was just described above, but the use of parentheses lets you define multiple logical directions in a single line.
- move C1 C2
- Moves piece on C1 to C2. Does not set $oldpiece, $origin, or $dest. This is frequently used for moving pieces around while evaluating potential moves. This command used to move flags too, but it no longer does. I realized I had been using this command without that feature in mind, I can't think of a particular game where flags need to move with pieces, and if you are coding one, it would be best to make the movement of flags explicit.
- recolor C Color_Index
- recolor (C1, C2, ... Cn) Color_Index
- This changes the color index of a space to the new Color_Index value. A solitary space may be given, or a set of spaces may be given as an array. When that is done, all spaces in the array will be set to the same color. The Color_Index should be an integer between zero and the number of colors minus one. The colors have previously been defined in the Colors field. If you're displaying the board in ASCII, it will use a character from the Patterns field in place of a color. The Color_Index can be given as a single integer or as an expression.
- remove C1 ... Cn [Deprecated: Same as Delete]
- Removes every space listed by its coordinates.
- replace [not] P1 P2 [all|any|first|last|left|right] C1 ... Cn
- Works much like drop, described above, except that it is more generalized. While drop works with empty spaces, replace works on spaces with piece P1 on them. When the not keyword is used, replace works on spaces that do not have piece P1 on them. One of the main uses of replace is to replace all of one piece type with another.
- reserve [left|right|first|second] [number] P1 [number] [P2] ...
- Places pieces in reserve. The reserve area of the board is defined by the system variable $starpath. You need to set this variable before this command will be useful. The minimum parameter required is the label for a piece. It will start searching the spaces listed in $starpath[0] for an empty space, and it will add the piece to the first empty space found. The keywords left and second will make it search along the path defined in $starpath[1] instead. These may be different areas of the board, or they may be the same area with coordinates listed in reverse order from each other. $starpath[0] is normally used for the first player's reserve area, and $starpath[1] is normally used for the second player's. These areas are used with the * operator to drop pieces from. When a number appears before a piece label, it means to put that many of the following piece into reserve. Other numbers and pieces are optional. This command can take a list of pieces and their quantities to put in reserve at once. This makes it useful for composing Shogi Tsumi or fairy chess problems for games that allow piece drops. Because of the directional nature of the command, it should be used separately for each player's pieces.
- resign
- Resigns you from a game, causing your opponent to be declared the winner. Should never be used in automation. For use only by a player wishing to resign.
- restore [label]
- Restores the board configuration, color indexes, flags, and information on the last move to what it was when the store command was last used with the same label. When a label is not specified, the default label is "last", the same as it is for the store command. This command is useful for restoring the actual board position after making hypothetical moves while testing for checkmate or stalemate.
- reverse C1 ... Cn
- Reverses the order of the contents of the listed coordinates.
- rlink direction-name (C1 C2 ...) ...
- The same as link, but in reverse. Adds the named logical direction to specified spaces on the logical map of the board. It takes a series of coordinates, each in a pair of parentheses. For each coordinate except the first, it assigns the direction name to the preceding coordinate. A series must be at least a pair of coordinates, but it can be more. For example,
link s (a1 a2 a3 a4 a5 a6 a7 a8)defines the direction of s for all the coordinates in the a file of a chessboard. This is the direction going from the 8th rank to the first. Direction names are not symmetrical, because that would be kind of stupid. This is similar to how Zillions of Games does the same kind of thing. See map above for further details on logical directions. - rotate C1 ... Cn
- Rotates the listed coordinates, so that the contents of each coordinate is moved to the next coordinate in the list, and the contents of the last coordinate is moved to the first coordinate in the list. Useful for Motorotor.
- setlegal
- Sets a move as legal. Legal moves will be listed in the autocomplete for the moves field, and they will be highlighted when a player clicks on a piece with legal moves. For additional information on using setlegal, see How to Make Your Game Display Legal Moves in Game Courier - A Tutorial.
- setlegal from to
- Sets a move from from to to as legal
- setlegal from to1 to2 ... ton
- Sets as legal each move from from to each subsequent coordinate.
- setlegal from1 (expression1) ...
- For each coordinate with an expression following it, it sets as legal each move from the coordinate to each value in the final result of the expression. This expression may evaluate to a single value, or it may be an array of coordinates.
- setlegal from1 (to1-1 to1-2 ... to1-n) from2 (to2-1 ... to2-n)
- Sets as legal each move from from1 to each coordinate in the array following it, then sets as legal each move from from2 to each coordinate in the array following it, and so on. This is one application of what was described just above.
- setlegal (array) ...
- Sets as legal the move described by the array. This must be an array of coordinates and not an expression. A series of three or more coordinates will be interpreted as a multi-part move that passes through each space. Multiple arrays may be entered, and each will be interpreted as a separate move.
- setlegal "string" ...
- Sets as legal the move described by each string. Each string must contain a well-formatted move or series of moves, including the piece label.
- shift C1 ... Cn
- Shifts the listed coordinates, so that the contents of each coordinate is moved to the next coordinate in the list. The first coordinate is emptied, and the contents of the last coordinate are lost.
- shuffle C1 C2 ... C2
- Randomly shuffles the contents of the listed coordinates.
- store [label]
- Stores the current board configuration, color indexes, flags, and information about the last move. Used with a label, it stores all this information to a unique storage space identified by the label. This allows you to keep a record of multiple past positions. Used without a label, it uses "last" as the default label. It is commonly used without a label to store the current game configuration while trying out possible moves, which can then be restored with the restore command.
- swap C1 C2 ... Cn-1 Cn
- Swaps the contents of the coordinates in each pair of positions. With two arguments, swap, reverse, and rotate all function the same.
- unlink
- Unlinks spaces from each other that have been linked with logical directions by map, link, or rlink. See below for different ways of using this command.
- unlink C1 ... Cn
- Completely unlinks each listed coordinate from any space it is linked to. Coordinates may also be specified with wildcards, using * for an indeterminate number of other characters. So,
unlink *would unlink all coordinates from each other. - unlink (C1 ... Cn) ...
- Unlinks any coordinates within parentheses with each other from each other. Typically used with pairs, though it may be used this way with larger groups. When wildcards are used, it will not unlink coordinates matching the same wildcard from each other. When coordinates match a wildcard, they will be unlinked only from separately listed coordinates or wildcards. So, for example, (e* f*) would completely unlink the e and f files from each other, but it would leave spaces in each file linked to other spaces in the file.
- unlink ((C1 ... Cn) (Co ... Cz)) ...
- Inside nested parentheses, it unlinks everything in one set of parentheses from everything in any other set of parentheses. So, on a normally linked chessboard,
unlink (e1 e2 e3 e4 e5 e6 e7 e8) (f1 f2 f3 f4 f5 f6 f7 f8))is equivalent tounlink (e* f*). When wildcards are used inside nested parentheses, they effectively expand into the coordinates they match. So,unlink ((e*) (f*))is equivalent tounlink (e1 e2 e3 e4 e5 e6 e7 e8) (f1 f2 f3 f4 f5 f6 f7 f8)), as well as tounlink (e* f*). However,unlink ((e* f*) g*)is not equivalent tounlink (e* f* g*). The former would unlink anything in the e or f file from anything in the g file and vice versa, whereas the latter would unlink anything in the e, f, or g files from anything in the other two files. - unlink D1 C1 ... Cn D2 ...
- Unlinks individual directions from the named coordinates. The direction, indicated by D1 here, is given first, and that direction is removed from any following coordinates until a new direction is provided. It can continue to unlink spaces from the new direction until a new one is given and so on. So that it can properly distinguish between coordinates and directions, it is important to never use the same labels for both. Unlike the other uses of unlink, this is more surgical, as it allows for specific asymmetrical unlinking. When used with wildcards for coordinates, it will unlink every space matching the wildcard from the designated coordinate.
I have also implemented a method for handling dice rolls. Enclose a list of piece letters in brackets, and move it to a space like you were moving a single piece there. For example, [KQRBNP]-Dice1. This will randomly select one of the listed pieces and place it at the coordinate die1. This is suitable mainly for Chess dice. To use it for numbered dice, you would need to include appropriate graphic images in your piece set.
For examples of automation and randomization in actual presets, check these presets out in Edit mode:
- Brand X Random Chess
- Randomizes the setup with
shufflein the Pre-Game automatic move. - Fischer Random Chess
- Uses
drop,copy, andflipin the Pre-Game automatic move to randomize the setup according to Fischer's rules for randomizing the setup. - Motorotor
- Uses Post-Move 1 to rotate the board after every move.
- Vegas Fun Chess
- Makes dice rolls with the two Pre-Move automatic moves.
Revision Commands
The commands in this section revise the current move. This is useful for allowing a player to enter more complicated moves with just the mouse. While these commands do not ask for user input, the next section contains commands that both ask for user input and revise the move based on the value of the input.
Input Commands
Because Game Courier will run an entire program that includes all past moves each time someone makes a new move, it would not be feasible to include input commands that set a variable. But input commands can be useful so long as each one asks a player something only once and then remembers the results. Most of the following commands remember the results by modifying the move. One of them remembers its result by storing it in a constant. Many of these are used to better enable a player to make all moves by clicking (or touching) pieces.
- ask question answer-1 move-1 ... answer-n move-n
- The question is text presented to the player. This is followed by two or more pairs of answers and moves. This command is to be used when a player makes an ambiguous move. Instead of proceeding straight to verification of the move, it asks a question and presents the player with choices in the form of radio button options. The answer a player chooses will determine how the move will be appended. Once the move is appended, it will proceed to the usual form for verifying the move, assuming that the code does not create an infinite loop with this command. If this command is used unconditionally, it will create an infinite loop. To prevent an infinite loop, it must be used with a condition that changes after this command disambiguates the move it was used with. This can usually be done by examining the move itself. When the move is incomplete or ambiguous, it is appropriate to use this command, but when a move is complete and unambiguous, this command should not be used. To give one example, I have used this command in Shogi. When a player makes a move where promotion is optional but not mandatory and promotion hasn't been specified, it uses this command to ask whether a player wishes to promote the piece. When the player chooses "No", I have had it append a "skip" command to the move just to make the move unambiguous and prevent it from repeatedly using the ask command in an infinite loop. This also prevents the command from being used for past moves.
- askpromote array
- askpromote P1 ... Pn
- Like ask above, this asks a question and appends the move based on the answer selected. It specifically asks the question, "Which piece will you promote to?" It should be followed by the labels identifying the choices for promotion or an array with the same information. It presents the choices with images of the pieces. It should be used when a piece gains the option to promote to one of two or more different pieces, and the promotion has not already been written into the move. I have used this command in the Pawn subroutines in the Chess include file for allowing the player to decide which piece he will promote a Pawn to when it reaches the last rank. Since the Pawn cannot, by the rules of Chess, remain a Pawn, adding the selected promotion always makes the move unambiguous, preventing askpromote from being used more than once for the same move during a game. Nevertheless, this command can create an infinite loop if used unconditionally. It should always be used conditionally under certain circumstances.
- continuemove
- This command allows multi-part moves to be made with the mouse. Instead of moving on to the form for verifying a move, this command sets things up so that the form will ask for a continuation of the move instead of asking for its confirmaion. When asking for a continuation of the move, the form will place the moves already made by the player during this turn in the "Past Moves" field. After the player makes an additional move, it will be appended to the moves already in the "Past Moves" field. I have used this command with multi-move variants like Extra Move Chess and Marseillais Chess. To avoid infinite loops, this command should be used only for incomplete moves, and it should be used in a conditional, not all by itself. So that it is called only for the current move, it should be used in the Post-Game sections, not in the Pre- or Post-Move sections, which get repeated for each past move. Since it does not exit the program, it should be placed near the end of the program.
- input constant question [arg1 arg2 ...]
- This command asks the player a question and stores the answer in a named constant. When it finds that the constant is already set, it skips the question and does nothing. Arguments after the question are optional. When there are none, the user may write an answer in a text field. When only one argument follows the question, it is used as the value for a checkbox field, and it is printed as text. When more than one argument is given, multiple choices are given as radio button fields. When the argument is a string, it will be used for the value of the radio button field, and it will be displayed as text. If that string is a piece label or a coordinate label, it will also display the piece or coordinate. When the argument is an array, the array's first element will be used for the value of the radio button field, the rest will be displayed as text, and no image will be displayed. See the code for Mystery Chess for an example.
- redomove
- This command repeals the last move and prompts the player to move again. In correspondence games, it goes back to the form for moving instead of forward to the form for verifying a move. Although it removes the last move from the movelist, as though it were never made, it does not return the board to the position it was in before the last move was made. This is left up to other code in the program. Depending on what kind of moves are expected, this can be done with "add old dest; add moved origin;" or with "restore". If restore is used, store should be placed in the pre-move code, so that the board position is stored before any moves are made. This command functions like continuemove except that it discards the last move made instead of letting a player add to it. The main purpose of this command is to allow players to redo illegal moves. To avoid infinite loops, this command should never be used unconditionally.
Output Commands
The first four commands output text immediately and are intended for debugging or for writing error messages for the player to see. If the GAME Code program completes successfully, output from these commands will be hidden, though you may still view it by viewing the page source. But if the GAME Code program exits prematurely, Game Courier will not reach the CSS code for hiding the output, and it will remain visible. This makes it useful for displaying error messages when a player makes an illegal move. The last two set strings of text that will be displayed after the GAME Code program has completely finished. These are useful for communicating information to players.
- die text
- Displays text on screen and exits Game Courier program. This is intended for writing messages about illegal moves. To set it off from other output, it will be formatted as a top-level heading. This works out, since you can use this only once in the execution of a program, and when it is used, there will be no further text on the page.
- echo text
- Displays text on screen. Useful for placing a message at the top of the preset and for displaying debugging messages.
- print expression
- Displays the value of the expression on screen.
- printr variable
- Displays the value of the named variable on screen. Useful for displaying values of arrays.
- remind text
- Displays reminder text, which will be displayed lower and smaller than the text displayed with the say command. Since the output is displayed after the GAME Code program ends, repeated uses will not display multiple messages, only the message given in the last use of remind will be displayed, and it will not display anything when the GAME Code program exits prematurely. It is intended for general reminders, not for game status updates or error messages.
- say text
- Displays a message in boldface above the board. Since the output is displayed after the GAME Code program ends, repeated uses will not display multiple messages, only the message given in the last use of say will be displayed, and it will not display anything when the GAME Code program exits prematurely. It is useful for displaying messages about the status of the game, such as "Check!", "Checkmate! White wins!", "Stalemate! Drawn game!", etc., but it is not useful for displaying error messages.
Data Storage
GAME Code lets you store data in variables, constants, and flags. Variables are for any kind of data. User variables last only for the duration of the scope they were created in, and they may be changed at any time. System variables are selected PHP variables used by Game Courier itself. Constants are for data that is expected to never change or that must be preserved during the course of a game. Flags are like variables but only for the Boolean values true and false. Constants, flags and system variables all have global scope, but user variables may be created in different scopes. This allows you to use the same variable name in a function, subroutine, or block without affecting your use of the same variable name in other parts of the program.
One important difference from other languages I've used is that names are not automatically treated as variables, constants, or flags. Instead, it distinguishes between the name of a variable, constant or flag and a call to one. Much like you can name or call a function, you can name or call a variable, a constant, or a flag. Calling it will return its value. One way of doing this is to prepend # before a user variable's name, $ before a system variable's name, @ before a constant's name, or ? before a flag's name. You can also use these recursively. For example, @#V would return the constant with the name matching the value of variable V. With most commands, these return the current value when the command is run. For function definitions, though, it returns the value at the time the function is executed. Function defintions used to use the value at the time they were defined, but they no longer do. When a function is defined, any string beginning with #, $, @ or ? will be stored as is in the function definition, and it will evaluate to the current value only when the function is called.
Within expressions, you may also call the value by preceding the name with var for a user variable, system for a system variable, const for a constant, or flag for a flag. When using these, you should normally use the name by itself without prepending anything to it. If you used something like var #V, you would get the value of the variable whose name is stored in the variable named V. If you just want the value of V, use either var V or #V.
While this may make things a little more confusing, it lets you easily turn strings into variables and use variable values as variable names. Likewise, constant names are not automatically treated as constants, and flag names are not automatically treated as flags. One additional advantage of this is that you can use the same name for a variable, a constant, and a flag. In fact, you could even use the same name for a function and a subroutine. These all use different name spaces, and it is sometimes useful to have different types of data associated with the same piece or position. While other languages might let you do this through creating objects, GAME Code is not object oriented, and this makes up for that a bit. Because names are independent from what they are names for, storing data is not as simple as using an assignment operator, and retrieving stored data is not as simple as entering the name of your stored data.
You can store data in regular variables with the set command, in system variables with the setsystem command, and in constants with the setconst command. For each one, you follow the command with the name of the variable and then with the value to set it to. This value may be entered as an expression. Since flags have only two possible values, you can set a flag to true with the setflag command and to false with the unsetflag command. You may pass any number of flag names as arguments to the same command. With function and subroutine calls, you can pass values to variables that are local to the function or subroutine. There are some additional commands for modifying regular variables, and because functions are one line expressions that don't let you run commands except by calling subroutines, there is special notation for setting variables within functions.
Variables
There are two main types of variables you may use. User variables are the regular variables you create in your code. You may generally call these whatever you like, but you may not begin a variable name with a digit. To keep future changes to the language from breaking your code, I recommend keeping your variable names entirely alphabetic or alphanumeric, using only hyphens or underscores as separators. System variables are selected PHP variables that may contain useful information or may change the behavior of Game Courier. They already exist, and their names are already provided. Because they occupy a different namespace than user variables, they are set and accessed differently.
You may access a variable in an expression by preceding its name with they keyword var.
GAME Code allows you to set and use variables. You may set a variable with the set command. While you could use set to modify the value of a variable based on what the value already was, this would involve retrieving the variable twice. The following commands are a it quicker, because they retrieve the variable only once: In GAME Code, there is no strict typing of variables, and values of different types may be compared. You don't have to define a variable's type before using it, but it is worthwhile to note that the values of variables do have types. Types of data include Booleans, integers, strings, and arrays. You can tell what type a value is by passing it to the type operator. Depending on what is needed, GAME Code may sometimes convert a value of one type to a value of another type. The only Boolean values are true and false. Conditional control structures such as if and do test for truth and falsity. While many operations may return Boolean values, some will not. In those cases, any empty, zero, or null value is treated as false, and other values are treated as true. Flags deal exclusively with Boolean values, but variables and constants may also have Boolean values. Most comparison operators return Boolean values. Here is a brief rundown of those that do: There are various operators you may use with Boolean values. These include the Dual Unary/Binary operators and (or &&), or (or ||), nand, nor, onlyif, and unless. When these have two arguments, they function as binary operators. The first four, along with xor are logical operators, and the following table illustrates when each of these expressions will evaluate to true: The onlyif and unless operators are conditional operators that are useful for flow control in recursive functions. For each of these, the first argument is a condition, and the second should normally be an expression in parentheses. Used like this, onlyif will allow evaluation of the expression in the second argument only if the condition in the first is true, and unless will allow its evaluation unless the condition is true. When the condition is false, onlyif will break out of the function and return a value of false, and when the condition is true, unless will break out of the function and return a value of true. With the exception of xor, which is a fully symmetrical operation, these operators can be used to break out of a function early when the single argument given to it is enough to determine the value of the expression as a whole. The following table indicates how each operator behaves with only one argument. One use for using these operators with single arguments is to optimize functions by making them exit as soon as possible. Another use is to prevent calling functions or subroutines that have not been defined. For example, the following code is used in Chess: The first conditional here confirms that #codename is the name of a subroutine before trying to call it. If it is not the name is a subroutine, it will exit early without calling it and move to the next line. Just in case it was the name of a subrotoutine, and that subroutine already returned false, it confirms that #codename is not the name of a subroutine. After all, if the subroutine already returned false, the function should too, and calling it would be a waste of time. But if #codename is not the name of a subroutine, then it will try to call the function by the same name so long as #codename is actually the name of a function. So, it tries to confirm that first, and if it is indeed the name of a function, it calls the function. Since and and onlyif can function the same way here, the main reason to favor one over the other would be whether you are trying to return a truth value or are trying to control flow in a recursive or lambda function. For truth values, favor and and or, and for control flow, favor onlyif or unless. This will help make you intent clearer and your code easier to read. Numbers may be integers or floating point numbers. The type operator identifies the latter as type double. GAME Code provides various mathematical operators for doing calculations with numbers. Here is a brief overview of the numeric operators: Although we normally write numbers in base ten, the computer internally represents integers as binary numbers. It represents an integer as a series of bits. This is the smallest unit of data, and it can be either on or off. To represent numbers in base two, an on bit represents the digit 1, and an off bit represents the digit 0. To convert a numeric literal to an integer, you may use the int operator. This will let you write integers as binary, octal, decimal, and hexadecimal numerals, and it will round off floating point numbers. Because computers natively use base two, there are some operators for manipulating bits. One use of this is to pack multiple flags into a single value. The operators that work on binary numbers are <<, >>, bitnot, bitand or &, bitor or |, and bitxor. The first three work on single binary numbers. The other three compare two two binary numbers and returns a binary number that reflects the same operation peformed on each pair of corresponding bits. Here is a table detailing the results of each: One of the things a series of bits is commonly used to represent is a character. Characters are individual letters, digits, punctuation marks, and other images that can be found in a character set. The two main operators for dealing with individual characters are chr and ord. The former returns the character associated wth a particular integer value, and the latter returns the integer value associated with a particular character. For example, Strings are series of characters. These may be used to represent words, names, and sentences. Here are various operators for identifying what types of characters a string is made of:
Here are various operators for manipulating strings: An array is a collection of values that are grouped together. Typically, they have the same root address, but each has its own subaddress. Here's an example: This produces the following output: You'll see that each element of the array has a key and a value. The key appears in brackets, and the keys in this array are all integers in increasing order from zero. This is the default behavior when you don't explicitly specify the keys. You may generally use any positive integer or alphanumeric string as a key. For example, This produces the following output: It is best to not use such disorganized arrays, though. It is better to use one of two types of arrays. One is the sequentially, numerically indexed array. This kind of array keeps things in a specific order that is visible in the names of the keys. The other is an associative array. This uses alphanumeric strings for keys. To give one example, the $originalpieces array for Chess looks like this: The following commands are specifically for arrays: Note that setelem is no longer needed, but it is retained to not break old code. It is now possible to refer to an array element with a single variable. Just use a period to separate the array's name from the name of the array element. For deeper arrays, just add more element names with a period between each one and its parent array. In each case, the array's name goes to the left of the array element's name. Unlike variable names, which must start with an alphabetic character, array elements may be entirely numeric. Here is an example that uses the set command instead of the setelem command: For the sake of being able to reuse variable names in different subroutines, the same variable name can be used for different variables within different scopes. Even if you were careful to give all variables unique names, recursive subroutines would still require the use of scoping. Scope can differ in width, and it can differ over whether it is made narrower dynamically or lexically. The widest scope belongs to global variables. These last until the end of the program, and as long as they have no competition for the same name, they are visible to all parts of the program. When two variables with overlapping scopes have the same name, the one with narrower scope will be chosen over the one with wider scope. Local scopes are strict subsets of the global scope. So, when you have a local variable and a global variable with the same name, the global one will be invisible. But when the local scope is closed, the global variable will become visible again. Here's an example: Besides dynamic scope, there is lexical scope, which depends on the name of the subroutine. Static scope differs from global scope by being connected to a subroutine rather than to the main program. Like global scope, it has a dynamic scope of 0, which means it never closes. Consider the following example: If sv were a local variable, its value would be reset each time the subroutine was run. But a static variable keeps its value between subroutine calls. So, the first call to stat prints 0 and 6, but the second call prints 6 and 12. Before, in between, and after the subroutine calls, the value 55 is printed for sv. Note that in GAME Code, two different subroutines never share lexical scope. If you create one subroutine within another subroutine, it has no significance, and the two subroutines have no special relationship with each other. In GAME Code, lexical scope behaves as if you created all your subroutines at the global scope. Static and local scope each differ from global scope in one respect, but each is like global scope in one respect. While static scope is limited to a specific subroutine, it shares with global scope the feature of never closing. While local scope can close, it shares with global scope visibility in higher dynamic scopes. There is one more type of scope, which combines the two respects in which local and static scopes differ from global scopes. A my scope is tied to a specific subroutine, and it closes when the subroutine closes. This is the narrowest of scopes. It has greater precedence than other scopes, and it is useful when a variable will not be needed outside the subroutine, and calls to the same subroutine do not need to remember its value. When different variables have the same name, GAME Code recognizes my variables first, static variables second, local variables third, with precedence given to more local variables, and global variables last. By default, any variable passed as a parameter of a subroutine is local to the subroutine, and any new variable is global. To use static, my, or other local variables within a subroutine, they must first be defined by the appropriate command: Here are the commands for reading, setting, and creating variables. Flags are global boolean variables that exist in a different namespace than the other variables. This allows the same names to be used for flags and variables. Unlike variables, flags can be named with numbers or alphanumerics beginning with numbers. Flags are normally associated with board spaces. Some commands assume that every board space has an associated flag. The significance of a board space's flag will depend upon how it gets used in a program. Sometimes it will have no significance at all. A flag's value can be accessed by prefixing its name with a ? or by using the flag operator before its name in an expression. In a function definition, the former will use the value of the flag at the time the function is defined, and the latter will use the value of the flag at the time the function is called. If a flag is subject to change during a game, it is better to use the latter in a function definition. By default, any flag is false unless it has been set. These commands deal specifically with flags: Constants have even greater scope than variables. Let's call it trans-global scope or universal scope. While a variable's life begins and ends during a single run of the program, a constant will endure between separate runs. As you should be aware, Game Courier contructs and runs a fresh GAME Code program each time a player makes a move in a game. Once a constant gets set in a program, it will be available at the very start of the program on subsequent runs. For correspondence games, the values of constants get stored in the log, and for solitaire games, they get passed as form data. Constants are useful when some values in a game are determined randomly, and it is important to reuse the same values at the same points in the program each time it is run. For example, when Fischer Random Chess randomly arranges the pieces at the beginning of the game, the new order of pieces needs to be remembered each time a program is run for the game in question. The usual way of remembering this information was to store the seed used for random number generation in the log. But this messed up some games when the algorithm for selecting random numbers was rewritten. This brought on the need to store this information directly in the log. Constants work better for this purpose than variables do, because the same information has to be available for the same moves time and again. Constants can be accessed mainly in one of two ways. The const operator will return the value of the constant whose name follows it. This works in Polish notation expressions but not elsewhere. A constant can also be accessed by preceding its name with an @ sign. This designates a constant and is not used for anything else. If the constant does not exist, then it will return as itself. For backwards compatibility, a constant value may also be returned with a # sign prepended to it. But instead of having highest precedence, as it used to have, it now has lowest precedence. So, this will work only if you don't have a variable with the same name. The following commands are used with constants: GAME Code gives you access to some of the PHP variables used by Game Courier. These all exist outside the namespace for user variables. I named the following command before I implemented scoping. It does not affect the global variables mentioned above. Since GAME Code is an interpreted language, not a compiled one, it processes each line each time it executes it, and before processing it, it preprocesses it, which sometimes involves substituting some text for other text. When any of the following appear in a line, it gets replaced before processing the line. By prepending the name of a variable or constant with the appropriate symbol, its value can be used in any command or line of code. These will normally be replaced with the current value at the time the line is executed, but in function definitions, they will remain as they are and return whatever the current value is when the function is called. However, if they are enclosed in braces, as described in the next section, they will be evaluated at the time the function is defined. They may also be used together to call variables or constants by reference. For example, These are holdovers from when GAME Code wasn't a full programming language. You should use system variables instead. GAME Code evaluates expressions with Polish notation. This is a form of prefix notation that lists operators in an unambiguous order. Every operator gets listed before its operands, but the whole expression is evaluated in a back-to-front order, so that operands get evaluated before operators. Although Polish notation does not require parentheses to establish order of operations, GAME Code's line parsing allows the use of parentheses. Parentheses never get as far as the Polish notation calculator, but they do affect the input that does reach it. When text appears between parentheses, it gets parsed as an array. Since the process is recursive, nested parentheses will parse into multi-dimensional arrays. Arrays are useful for partitioning off operations that may take a variable number of operands. So parentheses can be used to control how many operands get passed to an operator. Some operators take the remainder of the stack for their operands unless the first operand is an array, in which case the contents of the array gets used for the operands. Another option is to include an operator at the beginning of an array and to pass the whole array as an operands to the eval operator. Polish Notation is simply a backwards form of Reverse Polish Notation (RPN), which was commonly used in HP Calculators. RPN was easier for early calculators to handle, because it could perform operations as they were entered and did not require parentheses to indicate the order in which to perform operations. The reverse order of RPN is essential for ease of use on a hand-held calculator, but it makes no difference when the whole expression is already entered into memory. In that case, it is just as easy to start from the beginning of an expression as it is to start from the end. So Game Courier starts evaluating the expression from the end, which allows you to put operators before operands. Here are the basic principles behind RPN. Whenever an operand is entered, it is pushed onto a stack. When an operator is entered, it pops off a certain number of operands from the stack, performs an operation on them, and pushes the result onto the top of the stack. When all is done, the stack should have only one value in it, and that is the result of the whole complex operation. Here are some examples to help you better understand. Take the expression "minus 8 3". First, 3 is pushed onto the stack, then 8 is pushed onto the stack, then both are popped off, 8 minus 3 is calculated, and the result, 5, is pushed back onto the stack. For a more complex example, consider "not and equal 7 3 not less 3 4". First, 4 and 3 are pushed onto the stack. Then they're popped off, and the value of 3 < 4, which is true, is pushed onto the stack. This value is popped back off, reversed by the not, and a false value is pushed onto the stack. Then 3 and 7 are pushed onto the stack. 7 and 3 are then popped off, and the value of 7==3, which is false, is pushed back onto the stack. The stack now has two values in it, both false. These two values are popped off for the and. The value of false and false, which is false, is pushed onto the stack. This is then popped back off, reversed by the not, and the value of true gets pushed onto the stack. This ends the calculation, and the expression, which is equivalent to !((7 == 3) && (3 >= 4)), has been calculated to be true. The operators are organized by how many operands each takes. These can handle either one or two operands. For some logical operations, it takes only one operand to know whether it will be true or false. For example, x and y is false if x is false, no matter what y is. Likewise, x or y is true if x is true, no matter what y is. In contrast to these, xor, the exclusive or, always depends on the value of both operands and so cannot work with just one argument. When the value of the sole operand is not enough to settle the value of the operation, it lets the expression continue without adding any new values to the stack. Behaving this way does not change the truth value of and or or, but it would sometimes change the truth value of nand or nor. Accordingly, nand and nor, which were once both included here, are now made to require two arguments. When two operands are available, each logical operator just evaluates the logical expression with both values and adds the value to the stack. The expression breaking behavior of these operators is useful for avoiding unnecessary calculation and for breaking out of recursive functions. The unless and onlyif functions also work with one or two operands. The following table lists the truth value returned for each pair of op1 and op2: These operators pop off a multiple number of arguments. When the first element on the stack is an array, some of them will pop off the array, base its calculations on the elements of the array, then push the result onto the stack. Otherwise, most of them use the entire stack for their calculations. Some use only the stack, and one, fn, pops off only as many as it needs. If you plan to use GAME Code for more than simple tasks, such as for enforcing the rules of a game, you will need to know about control structures. These are ways of controlling which code gets executed when. Control structures may be used to conditionally execute code, to repeat code, and to better organize code by separating it into separate modules. Conditionals evaluate expressions for truth or falsehood, and they execute certain code depending upon the value of the expression. Zero and empty values are taken to be false, while non-empty and non-zero values are taken to be true. All expressions should be written in recursive Polish notation. The if, elseif, else, and endif statements work together to create a series of tests that stops once one test turns up true. The if command is used for the first test of the series. All additional tests after the first are done with elseif. When the condition belonging to an if or elseif turns out to be true, the code following it gets executed. On reaching the next elseif or else statement, the code stops executing, and the program jumps to the endif statement. The else statement is used to introduce the code that executes when all the if and elseif tests have failed. The only statements that are required for this control structure are if and endif. The if statement must begin the structure, and the endif statement must end it. The use of elseif and else are optional. When you follow an if by another if before reaching its matching endif, then you have created a nested set of if statements. The inner if will have a higher scope, and you will need to close it with its own endif before closing the outer if. Note that an else followed by an if will raise the scope, but elseif will not. A switch-case block works as a computed goto for the body of code that fall between the switch command and the endswitch command. The switch command calculates the value of an expression, and when it is equal to one of the case labels, it jumps to the first line following the appropriate case label. It otherwise jumps to the line following the default label, assuming there is one, or to the end of the switch block. Since execution of lines continues until a break or endswitch command, you should normally place a break at the end of each separate body of code that belongs to a different case. As shown to the left, multiple case statements can lead to the same body of code, and a single case statement may be used for multiple labels. Case labels may be numeric values, Boolean values, or strings, but they should not be arrays. Although a series of case labels superficially resembles a series of if and elseif statements, and although they can sometimes be used for the same purpose, they are not at all the same thing. The case labels must be scalar constants, and their order does not matter, because this is a computed goto, not a series of tests. Although the PHP version of switch and case do work as a series of tests and allow expressions for cases, the version of switch and case used here is based on C, which allows only constant labels for cases. The reason for doing it this way is efficiency. A computed goto gets where it's going faster than a series of tests. If you ever do need to do a series of tests, if, elseif, and else do the job just fine. The for and foreach commands are used with the next command to create finite loops that iterate over the elements of an array. The do and loop commands are used to create potentially infinite loops that repeat while or until a condition is true. The break, continue, and redo commands interrupt the usual execution of for and do loops. The for and foreach commands are presently the same command with different names. They are based on the foreach command in Perl and PHP, which iterates through the elements of an array. The array may be expressed by parentheses, which will be handled by the line parser, by inserting an array variable with a # in front, which will also be handled by the parser, or by including an expression that will evaluate to an array. One or two iteration variables may be given to the for or foreach command. When only one is given, it will hold the value of each array element. When two are given, they must be given as an array of two names, and the first will hold the key of each element, while the second will hold the value. The loop will end when the end of the array is reached. But it may be stopped prematurely by the break command. A continue command will stop execution of an iteration and cause the loop to go to the next array element. If the end has been reached, it will stop. A redo command goes to the beginning of an iteration without going to the next array element. It could be used to create an infinite loop with a for loop. These three commands are normally used with conditions, though they could be used unconditionally. Loops may be nested inside each other, as shown to the left. Each next corresponds to the closest previous for or foreach that doesn't correspond to another. In the example shown, the inner next goes with the foreach, while the outer next goes with the for. The bottom example shows how a for loop can mimic the behavior of a for next loop in BASIC. The range operator used here creates an array of integers from 1 to 10, which the loop effectively counts through. The do command begins a loop, and the loop command ends it. Each command can take a condition with either the while or until keyword. A do while loop, shown at the top left, acts as a while loop does in C or PHP, and do loop until, shown just below it, works as a do until loop does in C or PHP. The first is useful when your loop might not need to loop at all, and the second is useful when your loop should loop at least once. Unlike its counterparts in C and PHP, the do loop, which is based on the same construct in BASIC, has a richer syntax. It allows until at the beginning and while at the end, one apiece at each end, and even neither at each end. With no conditions at each end, it creates an infinite loop unless a break command is used to exit the loop. A break command will exit from the innermost do loop, for next loop, or switch statement it is found in. As with for loops, the redo and continue commands may be used to redirect the flow of a loop. The redo command, borrowed from Perl, jumps back to the beginning of an iteration without checking any of the conditions of the loop. A continue command jumps to the bottom condition of a loop. So, a continue command would cause a loop to stop if the right conditions were met, but a redo command could create an infinite loop that disregards the conditions of the loop. One more condition available at the end of a loop is never. This is useful when you want to raise the scope to use some local variables. Also, giving a while condition to do and a never condition to loop works like a simple if statement. The style of for loop offered by C and PHP is not available in GAME Code, but its behavior can be duplicated with a do while loop as shown in this example. The initialization part of the for loop occurs just before the do command. The condition part of the for loop is the condition for the do while statement, and the increment part of the for loop is done just before the loop command. This example loops ten times, counting from zero to nine. By default, a player can enter any type of move, any number of move primitives, and even lines of GAME Code as a single move. This freedom is great for allowing Game Courier to support almost any Chess variant, but when you're coding the rules for a particular game, restricting user input will make it much easier to write code that fully enforces the rules. GAME Code allows you to make and use your own functions and subroutines. The general difference between them is that functions are meant to return values and should have no side effects, whereas subroutines are meant mainly for producing side effects and don't have to return values. But this distinction gets blurred, because subroutines may return values and don't have to produce side effects, and functions may produce side effects by calling subroutines that do produce them. So let me make the distinction more concrete. In GAME Code, a function is a one-line Polish Notation expression that may receive arguments through parameters, whereas a subroutine is made up of lines of code that fall between an introductory sub command and a concluding endsub command. The main advantage of a function over a subroutine is speed. Evaluating a single expression is faster than running multiple lines of code. The main advantages of a subroutine over a function are that it will let you include commands, make use of familiar control structures, and change the value of variables, constants, and flags. The sub and endsub commands are used for defining a subroutine. The gosub command is used for executing a subroutine, and the return command may be used for exiting a subroutine and returning a value. The verify command will also exit a subroutine. A subroutine is like a function, but, with the exception of arguments, it uses global variables by default, and it can be treated as nothing more than a body of code that can be reused. Nevertheless, a subroutine can behave as a function, and subroutines can be made recursive. The local and my commands can create local variables, and the static command can create static variables, like what are commonly used in the functions of other programming languages. The arguments passed to the subroutine are available in two ways. First, the arguments are copied to the variables listed as parameters of the subroutine. These variables all have local scope, which means they are visible to child subroutines but not to any parent subroutine. But this works only for arguments matching named parameters. In case more arguments are passed to a subroutine than it has named parameters for, all arguments passed to a subroutine are also available in an array called subargs. These have my scope, which makes them visible only to that particular subroutine call. Unlike local variables, these are not visible to child subroutines. The def command lets you create a one-line function that can be accessed with the fn operator of the Polish notation calculator. The first argument is the name of the function, and the remaining arguments define the function. The function's name should not match any built-in function name used by the Polish notation calculator. Otherwise, you will get unwanted results. The function should be defined as a Polish notation expression. It may also include placeholders or variable names for passed arguments. The original way is to use placeholders. Each placeholder should begin with the number sign and be followed only by digits, such as #0, #2, etc. The number following the number sign indicates which argument it is a placeholder for. #0 is a placeholder for the first argument, #1 for the second argument, etc. The highest numbered placeholder should not exceed the number of different placeholders that you use. So, for example, if you use #4 as a placeholder, you should also include #3, #2, and #1. The new way is to pass arguments to variables. These will be my scope variables, and they may be named whatever you like. To pass an argument to a variable, you should the = prefix with the variable name before you use the variable. There should be no space between the prefix and the variable name. This allows you to use varible names that otherwise match operator names. Using name as an example name, =name stores in name the value immediately after it, or if there is no value after it, it pops off the next argument in the substitutions stack. This stack contains the values passed as arguments. The right-most argument passed will be the first one to be popped off. Here is an example: Using this technique, it is possible to give default values to variables. To do this, use =name twice in a row with the default value immediately to the right. This will first assign the default value to the variable. It will then pop off the next value in the substitutions stack. If that stack is empty, though, it will not alter the value of the variable. With the default already assigned to it, it will use the default. Here is an example: This produces the output: Since arguments are passed to parameters in right to left order, only the leftmost ones will get the default values. In the example above, the variable o was defined with a function call that had only four arguments, and it got the default value for noun, which was the first from the left. So, any optional parameters should be placed on the left side when defining a function. Parameters more to the left are considered more optional than those to their right, since the rightmost parameters will get assigned first, and the remaining parameters will get default values only if the arguments run out. An alternative to using defining defaults for parameters is to assign values to variables that will not be included in the function call. Here's an example based on the one above. It assigns the same values to the variables m, n, and o. Note that default values will always override external assignments to the same variable name. So, this will not work for any parameter you give a default value to. A function normally evaluates its operators and operands from end to beginning. When it reads an operand, it immediately pushes it onto a stack. When it reads an operator, it pops off as many operators as it needs, then pushes the result of the operation onto the stack. Doing it this way allows operators to come before operands, and it allows for a fixed order of evaluation that does not have to be disambiguated with parentheses or rules of precedence. But there are times when you don't need to evaluate the whole expression, and you would like to either break out early or skip portions of an expression. You may do that with the operators and, or, nand, nor, onlyif, unless, and cond.
The first four are logical operators, the next two are mainly for recursive functions, and the last one is for selecting which of two expressions will be evaluated. Of these, the four logical operators and cond treat arrays as complete expressions rather than as arrays. Enclosing an expression in parentheses allows it to pass for an array until it reaches an operator that will conditionally trigger its evaluation. This keeps it from being evaluated too early. Let's look at an example: This reads in the two expressions enclosed in parentheses without doing anything with them. It then evaluates the highlighted condition, and depending on whether it is true or false, it evaluates the first expression for a true value or the second expression for a false value. If you wish the returned value to be an actual array, you should double up on parentheses, which will make the array the value of the expression. The four logical operators can do the same thing. This comes in handy for short-circuiting from a logical operation when the first value is enough to determine the truth value of the operation. When given two operands, each of these evaluates the first one first, and if that is enough to determine the truth value, it will not evaluate the second. For and, a single false value is enough to determine that the final result will be false. For nand, which means not and, it is enough to determine that the final value will be true. For or, a single true value is enough to determine that the whole expression will be true. For nor, which is a negation of or, it is enough to determine that the expression will be false. Besides being able to short-circuit when it has two expressions to evaluate, the logical operators may take a single operand. With a single operand, these will either return a value and exit early or allow an expression to continue without pushing a value to the stack. Compare these two expressions: Both of these should evaluate to false. For the first one, it will evaluate For similar reasons, or will immediately return true if it receives a single true operand, but if it receives a single false operand, it will drop away and let the left side determine the truth value of the whole expression. While nand and nor have similar behavior, their use in this way can be confusing and misleading. In the following example, both a and c evaluate to false, but b evaluates to true: Bear in mind here that when we use "nor" in speech, we say "neither-nor", because we are negating both parts. We don't normally use "nand" in speech at all, and the following example shows a similar problem with nand. Both a and c evaluate to false, but b evaluates to true. Unless your aim is to write obfuscated code, I do not recommend using nor or nand with single arguments. Like the logical operators, unless and onlyif can be used with one or two operators. Each of these should be read as allowing evaluation of the expression on the left unless or onlyif the first expression on the right is true. The second expression after unless or onlyif provides a return value if it determines that the left-side expression should not be evaluated. This makes the use of these like using cond. The following five statements return the same result: Note that when switching between onlyif and unless, you have to either switch the two potential value, or you have to reverse the condition to its negation. But do only one or the other, not both. With only one operand after the operator, unless and onlyif will return the value of the condition if it does not allow evaluation of the left side. This will normally be true for unless and false for onlyif. It could be something else, though, since non-Boolean values will be translated to Booleans for the sake of determining whether to allow evaluation of the left side. Here are some examples: In this example, a might get set to 1, 2, or 3, and b might get set to 0. These are not identical to true and false, but they are functional substitutes for them. When these operators are followed by a single expression that does evaluate to a Boolean, unless works like or, and onlyif works like and. So, in this example, a is equivalent to b, and c is equivalent to d: The first two evaluate to true. Each one evaluates == 8 9 first, and since it is false, it allows evaluation of the expression on the left, which is true. The last two evaluate to false. After each one evaluates == 8 9 to false, it immediately exits with a false value. While these can be used interchangely in some circumstances, there is one in which they cannot. Unlike the logical operators, unless and onlyif do not trigger the evaluation of expressions enclosed in parentheses. Instead, they just treat them as arrays. So, in the following example, a and c have the same values as before, but b is set to the array (== 8 9), and d is set to true. Because of this, I was led to think that unless and onlyif could be faster than or and and. But diagnostic testing shows they are actually slower. Perhaps it is because they are longer strings. In confirmation of this, diagnostics show that && is slightly faster than and. It's up to you whether you prefer to use unless and onlyif or the logical operators for flow control. I use the logical operators, because I have a solid grasp on their meaning and feel comfortable with them. But if unless and onlyif work better for you intuitively, go ahead and use them. For more on their use in control flow, I'll direct you to the Breaking Logic section of the Fairychess include file tutorial A lambda function is a nameless function that is defined on the spot. A lambda function is written and stored as an array, but to tell arrays and lambda functions apart, I have created a separate type for them. To create a lambda function object, write your function inside parentheses, or inside quotation marks, and place the keyword lambda in front of it. For example: Some built-in functions are designed for doing advanced operations with lambda functions. Since you can turn a string into a lambda function, it is possible to write code that creates specialized lambda functions. In this example, the #0 inside quotation marks is a parameter of the lambda function, but outside parentheses, it is a parameter of the doublesquare function. What this does is add a number to itself, then passes the doubled number to a lambda function that multiplies it by the original number. Breaking it down, it looks like this with 5 as the argument: While lambda functions are normally nameless, you can assign them to named variables. This is useful for creating local functions that you want to use in a certain subroutine. The In this example, A recursive function or subroutine is one that calls itself until a certain condition is met. When writing subroutines, it is more efficient to write your code in terms of loops, but that isn't an option for functions. So, when you need a function to repeat code multiple times, you can do that with recursion. The most important thing to remember about recursion is that any recursive function needs to have the option to return a value without calling itself again. Otherwise, you will create an infinite loop. So, avoid creating functions like the following: This function would go on forever, which would get in the way of continuing with your game. A recursive function should only call itself conditionally. It should include a condition that calls itself for one value but doesn't call itself for another. When it doesn't call itself, it should have a value it can return without calling itself. There are multiple ways of testing a condition in a function. You may use cond, onlyif, unless, and, or, nand, or nor. To illustrate this, let's look at different ways of defining a factorial function. The factorial of a postive integer is the product you get when you multiply it by each lower integer down to 1. For example, the factorial of 1 is 1, the factorial of 2 is 2, the factorial of 3 is 6, the factorial of 4 is 24, the factorial of 5 is 120, and so on. You may notice a certain pattern. Each factorial is the product of an integer and the factorial of the next lowest integer. For example, the factorial of 5, which is 120, is the product of 5 times 24, which is the factorial of 4. Likewise, 24 is 4 times 6, 6 is 3 times 2, 2 is 2 times 1, and 1 is 1 times 1. So, we can define a factorial recursively as the the product of the input with the factorial of the input minus 1. Putting that into code, it could look like this: This code multiples the input (#0) by 1 or by the factorial of the input minus 1. The dec operator decrements its input by one, making it equivalent to - #0 1. To better illustrate the logic of what is going on, this function is equivalent to this subroutine: Recursive subroutines are not recommended, though, because subroutines use more resources, and looping is a lot more efficient than using a recursive subroutine. With that in mind, this same subroutine could be rewritten like this: Getting back to using recursive functions, note that the following code, which looks superficially similar to the recursive function shown earlier, will create an infinite loop: The reason it creates an infinite loop is because it keeps calling the fac function before it does anything else. Putting the call to itself in parentheses stops it from being executed until cond triggers its evaluation. Another way to prevent an infinite loop is to put the code for the recursive call to itself to the left of the condition, which can be done with onlyif, unless, and the various logical operators. Here is another example using unless: In this example, unless has been given two arguments. The first is the condition, and the second is the value to return if that condition is true. When unless returns a value, it stops execution of the function right away. So, when it determines that the input is less than or equal to 1, it returns 1 right away and does not call itself. When unless receives a false condition, it allows execution of the code to its left, and it discards itself and everything to its right without passing on a value to the code on its left. The way to read an unless statement is that it will allow execution of whatever is on its left side UNLESS the condition it is given is true. It can also be used with a single argument. When given a single argument, it treats it as both the condition and the return value for being true. Since the true value produced by the <= operator is equal to 1, the following also works: With that in mind, the or operator can be used in place of unless like so: Instead of using unless, we could also use onlyif. This works like unless, except that it exits with a false value when its condition is false. It should be read as allowing the execution of the code to its left ONLY IF the condition it is given is true. If we keep the condition the same, we will get this, which will create an infinite loop: To prevent an infinite loop, we need to reverse the condition and leave the recursive function call on the left side of onlyif, like so: With only one argument, onlyif returns the false value instead of the true value. Since the false value of the less than operator is equal to zero, the following incorrect version of the factorial function produces a value of 0 or false for any value: While maybe not as useful, the normal logical operators can also be used for recursion with two arguments. When given two expressions in parentheses, each will evaluate the first expression first, and it will evaluate the second only if that is needed for determing the truth value of the whole expression. Because of this, the following code is safe: As you may tell by examining this code, and and nand will not evaluate the second expression if the first one is false, and or and nor will not evaluate the second expression if the first one is true. If you changed the truth value of the first expression in any of these test functions, though, you would freeze the page with endless recursion. The operator xor cannot be safely used in this way, because it would always have to evaluate both expressions. Because of this, it has not been designed to evaluate parenthesized expressions. Since I began programming computers, there has been a rapid evolution in their capabilities. In the early days, it was important to optimize every bit of code, because the computers then had very limited memory and very slow processors. With today's fast computers, optimization might not seem as important. But it can still matter. Consider that interpreted languages are slower than compiled languages. Any program not written into machine code has to be translated into machine code. A compiled language, such as C, saves time by doing the translation only once before running the program. An interpreted language, such as BASIC, does the translation each time it runs a program. Now consider that GAME Code is not only an interpreted language but one that it written in another interpreted language. GAME Code is written in PHP, which is written in C, which is already compiled into machine code. So, a GAME Code program will be slower than a PHP program, which will itself be slower than a C program. Furthermore, PHP imposes a time limit on how long it waits for a page to load. When a page does not load fast enough, PHP will stop execution of it and complain that it is taking too long. This is yet another reason to optimize code for speed. Let's start with one of the biggest processing-time hogs. Checking for check, checkmate and stalemate takes considerably longer than checking whether a single move is legal. It involves checking whether several different pieces can attack the King, it explores the possible moves available to the King, and it checks the legality of various potential moves. If all of this gets done after every single move, it will eventually slow Game Courier down enough to exceed PHP's time limit on loading a page. While it should be done after every move, it only has to be done once after each move. By placing code for check, checkmate, and stalemate in the Post-Game sections, it gets executed after each player moves. By preventing any move that leaves a player in check, checkmate, or stalemate, it allows us to assume that no prior move in the game left either player in check, checkmate, or stalemate. Furthermore, by using won, lost, and drawn commands to mark the end of the game by checkmate or stalemate, it prevents further moves from being made after the game ends. So the Post-Game sections are the only place where code is needed to check for check, checkmate, stalemate, or any other win/loss/draw conditions, and it saves a great deal of processing time to not place this code anywhere but there. When you want to check the legality of a move, the code used to evaluate the legality of the move will be determined by whatever piece was moved. There are three main ways of doing this. One is with a series of if and elseif statements, testing whether it is one piece after another. This is inefficient, because it evaluates multiple expressions until it finds the code for the piece that moved. By using switch and case, you can avoid evaluating multiple expressions, because it works as a computed goto. The switch statement evaluates the expression once and goes directly to the appropriate case statement. But even more efficient than this is the use of functions. GAME Code lets you use variables to specify function names. By defining functions named after the piece labels, you can use the label for a piece to call a function that evaluates whether the piece has made a legal move. In some cases, subroutines should be used instead of functions, because moving a piece may have side effects, such as moving the Rook while castling or taking a Pawn by en passant. In many of my include files, perhaps all of them, I have provided functions and subroutines for evaluating the legality of moves by different pieces. Besides the improvement in efficiency, this has the benefit of allowing you to reuse the same code in multiple places, such as a subroutine for telling whether the King is in check. This is done in some of my include files, such as xiangqi and chess2. In general, functions are faster than subroutines, because a function is a single line of code, whereas a subroutine is multiple lines of code. But it also depends on what your code is doing. For repetitive tasks, the looping structures available to subroutines are considerably faster and more efficient than having a function do the same thing by recursion. In tests I ran, a recursive function couldn't iterate any more than 107 times before hanging indefinitely, and it took between 4 to 5 times as long as a for loop took to count to 107. Bear in mind that this reduction in speed is due to the recursion, not to functions being slower. Another test revealed that subroutines handle recursion even more poorly than functions do. A recursive subroutine could iterate no more than 52 times, and it took longer than the recursive function iterating 107 times. In another comparison between functions and subroutines, I have programmed Chess in two different ways. One way tells whether the King is in check with a function that checks the spaces the King could be attacked from for the pieces that could attack it from those spaces. The other way tells whether a King is in check with a subroutine that loops through the enemy pieces, testing whether any can legally move to the King's space. In tests I ran of the time each takes, the function proved much faster than the subroutine. Functions and subroutines each have their place. Functions are good for tests that just need to return a value. Subroutines are good when you need to change the board, write to the screen, loop through values, or set values of flags, variables, or constants. Subroutines are also easier to debug and understand. The subroutine I just mentioned has its uses for Chess variants with pieces different from those in Chess, such as Cannons, and it doesn't have to be rewritten for games with different pieces. In contrast, the function used to tell whether the King is in check is designed specifically for the pieces in Chess and must be rewritten for games with additional pieces. Customizing your code to a specific game can speed it up but slow down your development. You have to balance which is more important. When checking the legality of a move with a function, you can optimize your code by making use of the built-in operators designed for this purpose. Note that operators for checking the legality of a certain type of move normally comes in two forms. For example, checkaleap will check the legality of a single leap, whereas checkleap will check the legality of any leap of the specified distance away. The first gives you precision when you need it, while the second is more efficient when it is all you need to do the job. To illustrate the difference, here are two functions for checking the legality of a Knight move: The second does the same job as the first but is much more efficient. To learn more about optimization, let's consider how the first could be made even less efficient. Notice that each checkaleap statement is separated by an or. GAME Code's functions use prefix notation, which always puts the operator to the left of the operands. So you might expect the function to look like this instead: This function would calculate the value of every checkaleap statement before doing any logical operations. The one that separates each pair of checkaleap statements with an or is more efficient, because it takes advantage of the or statement's ability to break out of an expression and immediately return a true value when it is given a single operand with a true value. So it will evaluate checkaleap statements only until it finds one that is true, then the function will immediately return true without evaluating the rest. The general principle here is to make a function do no more than is necessary to calculate its value. Taking advantage of the short-circuiting ability of logical operators helps with this. It also helps to write a function to perform easier operations before more complex operations. Consider this function for a Clodhopper move from Storm the Ivory Tower: Each piece in this game is restricted to moving in the directions indicated by arrows on the squares. The first thing this function does is calculate whether the move is in a legal direction with "fn legaldir #0 #1". Remember that GAME Code begins evaluation of a function from the end, not from the beginning. If its not in a legal direction, that's all it needs to know that the move is illegal, and it avoids calculating whether the move is otherwise legal. When and gets a single false value, it short-circuits the expression and returns a false value. As a game progresses, it will be filled with a series of legal moves, and it will run the code for checking the legality of these moves each time it runs through the code. Although you could place this code in the Post-Game sections, it is not recommended, because there may be side effects to some moves, such as en passant capture, promotion, moving another piece to a different location, etc. So this code should be placed in the Post-Move sections. What you can bear in mind is breaking out of a function early is not so useful in contexts where the function will rarely have cause to break out early. For example, the chess include file has code for testing whether the King is in check from a specific piece. This code has been designed to break out early if the King is in check, but most of the time, the King will not be in check, because the code will come at the end of a legal move that did not leave the King in check. In this example, the first function is from the chess include file, and the second might be a faster way to accomplish the same thing when the King is not in check, because the match command handles all comparisons at once: Variables of higher precedence are accessed faster than variables of lower precedence. To maximize the speed at which variables are accessed, which might shave microseconds off the speed of an operation, use my scoped variables in your subroutines. Just bear in mind that my scoped variables cannot be accessed by other subroutines. Also, constants are accessed faster than variables. If you use a value that will never change, you can speed up your code a little bit by using a constant for it. Flags are accessed just as fast as constants. When all you need is a boolean value with global scope, a flag is your best choice. Let me also point out some of the optimizations built into GAME Code. Functions make use of prefix notation, which is more optimized than the more usual infix notation. Prefix notation puts operators in an unambigous order, so that matters of precedence never arise. In contrast, infix notation puts operators in an ambiguous order that gets resolved either by precedence of operators or by parentheses. Consider the infix expression 4 + 5 * 6. Should it be (4 + 5) * 6, which is 54, or 4 + (5 * 6), which is 34? Parentheses disambiguate these two expressions, and so does order of precedence. Since multiplication precedes addition, it should be evaluated as 4 + (5 * 6). The thing is that this disambiguation is an extra step that prefix notation is able to avoid. The usual way for a computer to handle infix notation is to translate it into postfix or prefix notation and go from there. Working directly with prefix notation avoids this step. Prefix notation represents the two expressions above as * + 4 5 6 and as + 4 * 5 6, and it does not include any ambiguous expression that might be either one. Besides being more optimized than infix notation, prefix notation is not so unfamiliar to computer programmers. It is commonly used in Lisp and related languages, such as the language used for Zillions of Games, and it is the usual way to call functions in most programming languages. While optimization is important, it isn't always best to favor optimization over other considerations, such as development time, ease of understanding your code, and the ability to debug your code. Subroutines can sometimes be easier to write, understand, and debug. These are reasons for favoring subroutines even when functions would be more efficient. Generally, a function should be limited to a single easily understood task, such as checking the legality of a single move by a specific type of piece. You might make your code more efficient with long, complex functions, but it could also make your code harder to read and understand. In the end, use your judgement. Any given preset can be used for either a game or a fairy chess problem. Unlike a regular game, a fairy chess problem will not begin with the usual setup coded for use with the game. To accommodate both games and problems, make the same information about the game available whether it is a game played from the beginning or a problem that starts with a different setup. In particular, you should take these steps: Whenever your code produces a syntax error, you will get an error report and a full, formatted listing of the GAME Code program Game Courier has generated. This will provide useful data on what you need to fix. If you know that something is wrong but Game Courier is not giving you any error messages, you can force it to show you the full listing of a program by adding "&showcode=true" to the URL. A language reference is useful, but it doesn't go into how to do things with the language. That's what tutorials and examples are for. Let's start with the tutorials I have written. These cover many of the basic things you want to do for any game you program, such as enforcing rules and displaying legal moves. Dates are given after each, and, of course, the more recent tutorials are more relevant. When I decided to work on programming Circular Chess, the need for a new method arose. The previous methods, from early code in Anatomy of a Preset to the chess2 methods, all used the same built-in functions to evaluate piece movement. These functions all worked on the assumption that the board was a fixed plane of coordinates that extended outward from an origin point. This worked well enough for two-dimensional games whose positions can be plotted with Cartesian coordinates, but it doesn't work so well for three-dimensional games and other games with unusual topographies. In Circular Chess, the ranks are circular, looping back into themselves, so that the a and p files are adjacent. A King, for example, should be able to move directly from one of these files to the other. But in the usual mathematical way of representing boards, these files are at opposite ends, and the functions for checking piece movement would have to get more complicated, perhaps even being replaced by subroutines. Instead of doing that, I wrote some commands and built-in functions for using logical coordinates. If you have programmed games for Zillions-of-Games, then you will already be familiar with logical coordinates. Instead of being represented by their distance from an origin point, logical coordinates are abstractions whose relations to other coordinates are determined by defining directions from them and where those directions lead. In Circular Chess, for example, I might say that moving clockwise from a1 leads to b1, and moving counterclockwise from a1 leads to p1. I could actually call these directions by any names I choose, such as north and south, or forward and backward. The commands I wrote for defining the logical coordinates on a board are called map and link. The map command creates a large set of logical coordinates at once. It is useful for quickly creating logical coordinates whose relations match the usual mathematical coordinates. The link command defines directions between individual pairs of coordinates. Here is how I defined the cooordinates in Cicular Chess: Note that I didn't use the link command. Instead, I extended the file labels (listed in the Files field) to start repeating themselves. For it to map the hippogonal directions for Knight moves, I ended it with the first two files it began with. If I hadn't extended it, these commands would have worked for defining the directions normally used in Chess. If you were programming a 3D game, you could add additional directions, such as u (for up), d (for down), un, us, ue, uw, dn, ds, de, dw, une, dne, etc. To do this, you would need to establish the distance between planes and factor that into your direction definitions. Assuming that planes are 8x8 with a distance of 9 ranks between them, here are some examples: Having a distance of 9 between 8x8 planes allows you to place barriers between them of non-space, indicated by hyphens in the FEN code. If you place no barriers between them, then you can unlink planes with the unlink command. Besides learning the GAME Code language from this reference manual, you can gain deeper knowledge of it by studying actual examples. I have programmed several games in this language, and the code is available for you to study and learn from. The code for a game is normally split between the preset itself, which focuses on the rules of the specific game, and an include file, which includes various functions and subroutines that will be used by the GAME Code program. These frequently include functions for evaluating the legality of a piece's move, functions or subroutines for spotting check, and subroutines for castling, checkmate and/or stalemate. Many games can use the ones written for Chess, while other games require specialized versions. For the basics, study these presets and their include files: For examples of presets that make use of include files designed for other games, study these presets and their include files: For examples of more advanced programming techniques, study these presets and their include files: For additional examples, look at the other include files in the includes directory and also study the presets that use them. You can normally tell what game an include file is for by its name.Setting Variables
Types of Data
Booleans
Operator Description !== Returns true when both values are unequal or not the same type. For example, !== 0 false would be true even through != 0 false would be false. <= Less than or equal to >= Greater than or equal to equal or == Equality between values. In comparisons between values of different types, conversions may happen. For example, == A true and == B true are both true, though == A B is false.greater or >: Greater than identical or === Strict identity. Values are equal and of the same type. For example, === 0 false and === A true are both false.less or < Less than same Case insensitive comparison of two strings. For example, same chess Chess is true.samecase Returns true if two strings are both uppercase, both lowercase, or both mixed case. Useful for identifying pieces on the same side. unequal or != Returns true if two values are different. Differs from !== by converting values of different types. For example, != treats 0 as false, so that != 0 false is false.
Operator Truth conditions and #X #Y When #X and #Y are both true. or #X #Y When either #X or #Y is true, or both are true. nand #X #Y When the conjunction of #X and #Y is false. By De Morgan's theorem, this is equivalent to #X being false or #Y being false, meaning at least one is false. nor #X #Y When neither #X nor #Y are true, which is when both are false. xor #X #Y When #X is true, or #Y is true, but not when both are true.
Operator Behavior with one argument and Breaks out and returns false when the single argument is false or is an array with an expression evaluating to false. Otherwise discards value and allows function to continue. or Breaks out and returns true when the single argument is true or is an array with an expression evaluating to true. Otherwise discards value and allows function to continue. onlyif Breaks out and returns false when the single argument is false. Otherwise discards value and allows function to continue. Similar to and. unless Breaks out and returns false when the single argument is true. Otherwise discards value and allows function to continue.
if sub #codename $origin $dest and issub #codename:
elseif fn #codename $origin $dest and isfunc #codename and not issub #codename:
Numbers
Operator Return value abs Absolute value of operand. dec The operand minus one. dechex Converts a decimal number to a hexidecimal numeral even True if even, false if odd. hexdec Converts hexidecmal numeral to base ten. inc The operand plus one. neg Negative of operand odd True if odd, false if even. sign 1 if positive, -1 if negative, and 0 if zero. base #X #Y Converts #Y to a numeral in base #X div #X #Y Integer result of #X / #Y gcd #X #Y Greatest common denominator of #X and #Y max #X #Y The value that is greater. min #X #Y The value that is lower. minus #X #Y #X - #Y - #X #Y mod #X #Y The integer remainder of #X / #Y, or #X if #Y is zero. mult #X #Y The product of #X multiplied by #Y * #X #Y plus #X #Y The sum of #X plus #Y + #X #Y pow #X #Y #X to the power of #Y rand #X #Y A random number between #X and #Y. Integers
Operator Result bits Returns minimum number of bits needed to represent a number. onebits Returns number of one bits in a binary number. << Left shifts the bits in a binary number by placing a zero at the rightmost end and moving everything else one place to the left. In base two, this doubles the value of the number. >> Right shifts the bits in a binary number by discarding the rightmost bit and moving everything else one place to the right. When the last bit was zero, the original value was even, and this divides it in half. When the last bit was one, the original value was odd, and this returns half of the next lowest integer value. bitnot Reverses every bit in the binary number given as an argument.
bitand, & Returns a binary number with each bit set to one where arguments had the same bit set to one, and with each bit set to zero where either one had a zero bit. bitor, | Returns a binary number with each bit set to one where either argument had the same bit set to one, and with each bit set to zero where neither one had a bit set to one. bitxor, & Returns a binary number with each bit set to one where the two values had different bits set or to zero where they had the same bits set. Characters
chr 65 is A, and ord A is 65. The chr operator is useful for referring to characters with special meaning in the language when they are meant to be used in a string. For example, chr 59 is a semicolon. While a character is conceptually different from a string, it is not treated as a separate type. Instead, it is regarded as a string with a length of 1.Strings
Operator Description isalnum Returns true for a string with nothing but alphabetic or numeric characters in it. isalpha Returns true for a string that is composed entirely of alphabetic characters. isdigit Returns true for a string made up entirely of numeric digits. islower Returns true for a string made up entirely of lowercase alphabetic characters. isupper Returns true for a string made up entirely of uppercase alphabetic characters. Operator Description
strlen Returns number of characters in string. trim Trims white space off both ends of a string. char string N Returns the Nth minus one character from the string, since the first character has index 0. explode string separator Turns a string into an array by splitting it whereever the separator string appears. fnmatch wildcard string Returns whether the wildcard pattern matches the string. Wildcards may include ? for single characters and * for any number of characters. hamming Returns the hamming distance between two strings, which is the number of character differences between two strings of the same length. join or . Returns the concatenation of two strings. levenshtein Returns the Levenshtein distance, a.k.a. edit distance, between two strings. This is the minimum number of insertions, deletions, and substitutions it takes to transform one string into the other. regmatch RegExp string Returns whether the regular expression matches the string. Uses PHP's preg_match(). strstr needle haystack Calls PHP's strstr() function. Reports position of first string in second string, starting with 0. Arrays
set ra (This is an array of words);
printr ra;
Array
(
    [0] => This
    [1] => is
    [2] => an
    [3] => array
    [4] => of
    [5] => words
)
set ra.9 Queen;
setelem ra piece Knight;
set ra.3 Bishop;
printr ra;
Array
(
    [9] => Queen
    [piece] => Knight
    [3] => Bishop
)
Array
(
    [r] => 2
    [n] => 2
    [b] => 2
    [q] => 1
    [k] => 1
    [p] => 8
    [P] => 8
    [R] => 2
    [N] => 2
    [B] => 2
    [Q] => 1
    [K] => 1
)
set ra (This is an array of words);
print list #ra; // prints "This is an array of words"
echo #ra.5; // prints "words"
set ra.2 a;
set ra.3 series;
print list #ra; // prints "This is a series of words"
Variable Scope
set v 5; // Creates a global variable.
set x 7; // Creates another global variable.
echo #v; // Prints 5.
echo #x; // Prints 7.
do: // The do loop raises the scope
  local v; // Creates a local variable called v
  set v 8; // Assigns 8 to this local variable.
  set x 9; // Assigns 9 to the global variable x.
  echo #v; // prints 8
  echo #x; // prints 9
loop never; // Closes local scope
echo #v; // prints 5
echo #x; // prints 9
set sv 55;
echo #sv;
sub stat lv:
  static sv 0;

  echo "Initial value of sv:" #sv;
  set sv + #lv #sv;
  echo "Modified value of sv:" #sv;
endsub;
gosub stat 6;
echo #sv;
gosub stat 6;
echo #sv;
Scope Description Technical Details Global
Being dynamic variables with the widest scope, global variables can be created and accessed from anywhere in a program. By default, any new variable is global.
Indexed to the widest scope and to the main program as $uservar[0]["main"].
Local
Being dynamic variables with narrow scope, local variables are visible to any subroutines they call, but they are invisible to the main program and to any subroutines with wider scope. Where local variables exist, they supersede all dynamic variables with the same name but wider scope. So local variables supersede global variables, and local variables of narrower scope supersede local variables of wider scope. By default, any variable passed as the parameter of a subroutine is local. Other local variables must be created with the local command.
Indexed to the current scope and the main program as $uservar[$scope]["main"].
Static
Being lexical variables with the widest scope, static variables are visible only to the subroutine they are created in, but they retain their value through multiple calls to the same subroutine and between subroutine calls. Where static variables exist, they take precedence over any local or global variables with the same name. Static variables must be created with the static command.
Indexed to the widest scope and to the current subroutine name as $uservar[0][$sub[$scope]]. My
Being lexical variables with narrow scope, my variables are always unique to a specific subroutine call. Where they exist, they always take precedence over other variables with the same name. By default, any variable assignment in a function is to a my variable. Otherwise, my variables must be created with the my command.
Indexed to the current scope and the subroutine name as $uservar[$scope][$sub[$scope]]. Commands for Variables
Flags
Constants
System Variables
dest keyword.old keyword.moved keyword.origin keyword.piececount to set it to a count of the pieces in the current position.Preprocessing Substitutions
Notational Substitutions
Stored Value Substitutions
@#ref would return the value of the constant whose name is stored in the variable ref.var variable_name.const constant_name.system system_variable_name.Calculated Substitutions
Deprecated Substitutions
$old or $lastcaptured instead.$moved or $lastmoved instead.$origin instead.$dest instead. In your move notation, use the coordinate name of the space. If you're programmatically creating notation while the move is in progress, its value will be in $dest.Expressions
Nullary operators
empty operator to test whether your destination is empty. If you need your code to evaluate both past and potential moves, you need to use something like this: cond empty #0 capture (not empty #1), where #0 is the origin and #1 is the destination. If the piece has just moved, its origin will be empty, and capture should be used. If the piece hasn't moved, no capture has been made, and your code will need to check for potential capture by checking the contents of the destination.Unary operators
chr 45 is useful for putting a hyphen in a string that may be printed in messages.- 0 number.Dual Unary/Binary operators
op1 op2 and or nand nor T T T T F F T F F T T F F T F T T F F F F F T T Binary operators
Binary/Ternary Operators
what a1 n. A logical path may also be used if placed in parentheses, such as what a1 (n n).where a1 n. A logical path may also be used if placed in parentheses, such as where a1 (n n).Ternary Operators
Tetrary Operators
Hexary Operators
Multiple Arity Operators
fn lambda (+ * #0 #1 #2) 7 8 9 will multiply 7 and 8, add 9 to the product, and return the result, which is 65. It will also interpret an expression in an array as an unnamed lambda function. For example fn (* #0 #1) 5 7 will return 35. This allows you to create a function you will use in only one place without naming it. It also allows you to have the program construct functions before using them.intersection (a b c d e f g h) (a e i o u) gives the same result as intersection (a b c d e f g h) a e i o uwindingride #0 #1 1 0 1 1 or windingride #0 #1 0 1 1 1.Control Structures
Conditionals
if condition:
  code;
elseif condition:
  code;
elseif condition:
  code;
else:
  if condition:
    code;
  else:
    code;
  endif;
endif;
verify condition;
Used to conditionally exit a subroutine or the main program. When used at the base level of the program, it exits the program if the condition turns out false. When used within a subroutine, it returns from the subroutine. It will exit a subroutine or the program when its condition turns out to be false. It will allow the program to continue without interruption when it can verify that its condition is true. When used to exit a subroutine, it will return the value of false.
Switch and Case
switch expression:
  case label:
    code;
    break;
  case label:
  case label:
    code;
    break;
  case label label:
    code;
    break;
  default:
    code;
endswitch;
For and Do Loops
for (key val) array:
  if condition:
    continue;
  endif;
  foreach val array:
    if condition:
      redo;
    endif;
    if condition:
      break;
    endif;
    code;
  next;
next;

for x range 1 10:
  echo x;
next;
do while condition:
  code;
loop;

do:
  code;
loop until condition;

do:
  code;
  if condition:
    break;
  endif;
loop;

do until condition:
  if condition:
    redo;
  elseif condition:
    continue;
  endif;
loop while condition;

do:
  code;
loop never;
set i 0;
do while < i 10:
  code;
  inc i;
loop;
Including Files
Restricting User Input
Functions and Subroutines
Subroutines
User Defined Functions
def subtract - #first #second =first =second;
set diff fn subtract 10 3;
echo #diff; // 7
def madlib list The #noun in #place #verb #adverb on the #noun2 =noun =noun rain =place =place Spain =verb =verb falls =adverb =adverb mainly =noun2 =noun2 plain;
set m fn madlib;
set n fn madlib cars Detroit go quickly street;
set o fn madlib "New York" eats slowly dessert;
dump;
Array
(
    [0] => Array
        (
            [main] => Array
                (
                    [m] => The rain in Spain falls mainly on the plain
                    [n] => The cars in Detroit go quickly on the street
                    [o] => The rain in New York eats slowly on the dessert
                )

        )

)
set noun rain;
set place Spain;
set verb falls;
set adverb mainly;
set noun2 plain;

def madlib list The #noun in #place #verb #adverb on the #noun2 =noun =place =verb =adverb =noun2;
set m fn madlib;
set n fn madlib cars Detroit go quickly street;
set o fn madlib "New York" eats slowly dessert;
dump;
#0 | #1 | and | or
 T |  T |  T  | T
 T |  F |  F  | T
 F |  T |  F  | T
 F |  F |  F  | F
For and, a false value for either operand makes the whole expression false. For or, a value of true for either operand makes the whole expression true. Whenever one value is enough to determine the value of the logical expression, it breaks out of the whole expression it is evaluating, returning as its value the value of the logical expression. For example, == 77 * 4 9 and != 7 7 or != 8 9 would evaluate != 8 9 first and return true without evaluating the rest of the expression. So, for a false value, and breaks out with a value of false, and nand breaks out with a value of true, while for a true value, or breaks out with a value of true, and nor breaks out with a value of false. Otherwise, these operators simply allow the expression to continue without adding anything to the stack. For example, == 77 * 4 9 and != 7 7 or != 8 8 first evaluates != 8 8 to false, continues to != 7 7, which is evaluates as false, and then since the operator is and, it returns false without continuing with the rest of the expression. By returning nothing when it doesn't break, it allows multiple instances of variable arity operators in the same line. Consider an expression like or match insight #k 0 1 R Q match insight #k 1 0 R Q. Since match will use any arguments available, this would not work right. Instead of returning true if either match is true, or false otherwise, it would add the value of the right-most match to the list of operands for the left-most match, which would return true only if the left-most match is true. But by putting the or between the two match expressions, the expression match insight #k 0 1 R Q or match insight #k 1 0 R Q gives the correct results.
print cond bitand 1 5 "Odd" "Even";
print "Odd" onlyif bitand 1 5 "Even";
print "Even" unless bitand 1 5 "Odd";
The condition bitand 1 #0 is a test for whether a number is odd, and all three expressions will print the word "Odd". The expressions using onlyif and unless should be read from left to right. The first of these will print "Odd" only if 5 is odd. Otherwise, it will print "Even". The second will print "Even" unless 5 is odd, in which case it will print "Even". Note that the word preceding the operator, "Odd" in the case of onlyif or "Even" in the case of unless, are not parts of the expression evaluated by the operator. Instead of simply returning values, these two control the flow of the function. The onlyif operator allows the function to continue only if the condition is true, breaking out if it is false, and the unless operator allows the function to continue unless the condition is true, in which case it breaks out. When it does allow the function to continue, it discards the values of both expressions following it. When it doesn't allow the function to continue, it breaks out, returning the value of the second expression following it, or, if there is no second value, the boolean value false. By having a function call itself to the left of one of these operators, you can create a recursive function that does not fall into an infinite loop.Control Flow in Functions
def White_Charging_Knight cond < rank #0 rank #1 (checkleap #0 #1 1 2) (checkleap #0 #1 1 1 or checkleap #0 #1 1 0);
set a and (== 3 2) (== 5 5);
set b == 3 2 and == 5 5;
== 3 2 as false and push the value of false to the stack without evaluating == 5 5. For the second one, it will evaluate == 5 5 as true, but it will not push a value of true to the stack. If it did, b would be set to the array (true, false). Instead of this, it just drops off and allows the expression remaining on the left side to determine the value of the expression as a whole. In determining that the expression to its right was true, it determined that the truth value of a complete and operation would be the same as the truth value of the expression on its left side.
set a nor (== 3 3) (== 2 3);
set b == 3 3 nor == 2 3;
set c not == 3 3 nor == 2 3;
set a nand (== 3 3) (== 2 2);
set b == 3 3 nand == 2 2;
set c not == 3 3 nand == 2 2;
set a cond < 1 2 "One is the Loneliest Number." "One is the best.";
set b "One is the best." unless < 1 2 "One is the Loneliest Number.";
set c "One is the Loneliest Number." onlyif < 1 2 "One is the best.";
set d "One is the Loneliest Number." unless >= 1 2 "One is the best.";
set e "One is the best." onlyif >= 1 2 "One is the Loneliest Number.";
set a "The left Side" unless rand 0 3;
set b "The Left Side" onlyif rand 0 3;
set a == 3 3 or == 8 9;
set b == 3 3 unless == 8 9;
set c == 3 3 and == 8 9;
set d == 3 3 onlyif == 8 9;
set a == 3 3 or (== 8 9);
set b == 3 3 unless (== 8 9);
set c == 3 3 and (== 8 9);
set d == 3 3 onlyif (== 8 9);
Lambda Functions
set cube lambda (* * #0 #0 #0);
print fn #cube 5; // Prints 125
set square "* #0 #0";
print fn #square 6; // Prints 36
set a filter lambda (islower #1) spaces; will return an associative array of all the spaces with Black pieces.set k any lambda (#0 onlyif == space #0 k) spaces will return the position of the Black King.def doublesquare fn lambda join "* #0 " #0 + #0 #0;
print fn doublesquare 5; Prints 50
lambda join "* #0 " #0 + #0 #0
lambda "* #0 5" + 5 5
(* #0 5) 10
(* 10 5)
50
Local Functions with Named Lambda Functions
def command is not good for this, because all the functions it creates have a global scope. Here's an example from the stalemated subroutine in the fairychess include file:
	local cspaces friend friends from piece to movetype;

	if isupper space #kingpos:
		set friends lambda (onlyupper);
		set friend lambda (not haslower #0 and hasupper #0);
		set cspaces var wcastle;
	else:
		set friends lambda (onlylower);
		set friend lambda (not hasupper #0 and haslower #0);
		set cspaces var bcastle;
	endif;
friend and friends are local functions defined for use in the subroutine. When used, they appear as fn #friend and fn #friends. While I could have omitted the lambda keyword in defining these functions, using it makes it run a little more quickly, and it makes it clearer that this variable is being used as a function. As you can see, the cspaces variable does not include it, and it is not being used as a function.Recursion
def loop fn loop + 1 #0;
def fac * #0 cond <= #0 1 1 (fn fac dec #0);
sub fac num:
  if <= #num 1:
    return 1;
  else:
    return * #num sub fac dec #num;
  endif;
endsub;
sub fac num:
  set product 1;
  do until <= #num 1:
    set product * #product #num;
    dec num;
  loop;
  return #product;
endsub;
def fac * #0 cond <= #0 1 1 fn fac dec #0;
def fac * #0 fn fac dec #0 unless <= #0 1 1;
def fac * #0 fn fac dec #0 unless <= #0 1;
def fac * #0 fn fac dec #0 or <= #0 1;
def fac 1 onlyif <= #0 1 * #0 fn fac dec #0;
def fac * #0 fn fac dec #0 onlyif > #0 1 1;
def fac * #0 fn fac dec #0 onlyif > #0 1;
def and-test and (== 2 1) (fn and-test);
def nand-test nand (== 2 1) (fn nand-test);
def or-test or (== 1 1) (fn or-test);
def nor-test nor (== 1 1) (fn nor-test);
set a fn and-test;
set b fn nand-test;
set c fn or-test;
set d fn nor-test;
Optimization
Why Optimize?
Minimizing Time Hogs: Where to Check for Win/Loss/Draw Conditions
Checking the Legality of a Move: If-Elseif, Switch-Case, or Functions and Subroutines
Functions or Subroutines
Optimizing Functions
def N checkaleap #0 #1 2 1 or checkaleap #0 #1 -2 1 or checkaleap #0 #1 2 -1 or checkaleap #0 #1 -2 -1 or checkaleap #0 #1 1 2 or checkaleap #0 #1 -1 2 or checkaleap #0 #1 1 -2 or checkaleap #0 #1 -1 -2;
def N checkleap #0 #1 2 1;
def N or or or or or or or checkaleap #0 #1 2 1 checkaleap #0 #1 -2 1 checkaleap #0 #1 2 -1 checkaleap #0 #1 -2 -1 checkaleap #0 #1 1 2 checkaleap #0 #1 -1 2 checkaleap #0 #1 1 -2 checkaleap #0 #1 -1 -2;
def C cond cond empty #0 (not capture) (empty #1) (checkride #0 #1 1 1 or checkride #0 #1 0 1) (checkhop #0 #1 1 1 or checkhop #0 #1 0 1) and fn legaldir #0 #1;
def KNIGHT check what #0 1 2 check what #0 -1 2 check what #0 1 -2 check what #0 -1 -2 check what #0 2 1 check what #0 -2 1 check what #0 2 -1 check what #0 -2 -1 target #1;
def KNIGHT match #1 what #0 1 2 check #0 -1 2 what #0 1 -2 what #0 -1 -2 what #0 2 1 what #0 -2 1 what #0 2 -1 what #0 -2 -1;
Variables, Constants, and Flags
Speed Benefits of Prefix Notation
To Optimize or not to Optimize
Special Considerations
set k findpiece k spaces; and set K findpiece K spaces;.Debugging
Tutorials
Programming Unusual Topologies with Logical Coodinates
map n 0 1 s 0 -1 w -1 0 e 1 0; // Orthogonal directions
map nw -1 1 ne 1 1 sw -1 -1 se 1 -1; // Diagonal directions
map nne 1 2 nnw -1 2 sse 1 -2 ssw -1 -2; // Hippogonal directions
map nee 2 1 nww -2 1 sww -2 -1 see 2 -1; // Hippogonal directions
map u 0 9 d 0 -9; // Straight up and down
map un 0 10 us 0 -8 uw -1 9 ue 1 9; // Slanted up directions
map une 1 10 unw -1 10 use 1 -8 usw -1 -8; // Diagonal up directions
Examples
Written by Fergus Duniho
WWW Page Created: 12 August 2003.
Comments
Comments can be added with //, which is commonly used in C++ and PHP for comments. Anything following // in a line will be considered a comment. Use comments to describe what your code is doing, so that you and others may read and understand it better. It also helps to write comments as you program, because comments can remind you what you are trying to do.