Bomberman Chess
Do you remember the old Bomberman games for NES (and the Super Bomberman games on Super NES)? Bomberman places a bomb on the ground, runs away, and the bomb explodes in both orthogonal directions to take out obstacles and baddies. Late one night, I began to ponder how to use this in a chess variant. I think I have my answer.
This game was officially invented on April 24, 1999.
To Play
Most of these pages give ideas on what to use at the end. I'm doing that at the beginning.
If you own a copy of Omega Chess, you can use that board (ignoring the four corner squares and two of the outside rows; they are not used). Otherwise, you can create an 8 by 10 checkered board (lower-right square is black) and use it instead.
Find two checkers of different colours. Usually, checkers are red and black. If you're in this position, White can use the red checkers.
You can use the Queen, but it is not the same piece. It's now a Defuser, and is there to diffuse the Bombs (checkers) before they cause too much harm.
Follow the instructions below to set up and play the game.
Rules
Similar to FIDE Chess, but with a few changes (read below).
Board Setup
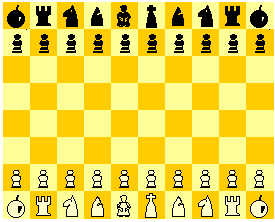
The board is an eight-by-ten checkered board, where there are two new pieces, described below. The pieces are two Bombs (O) and the Defuser (D). Because of the ten columns, there are two additional pawns. Thus, the board looks like this:
 White:
King f1; Defuser e1; Bombs a1, j1; Bishops d1, g1; Knights c1, h1; Rook
b1, i1; Pawn a2, b2, c2, d2, e2, f2, g2, h2, i2, j2.
Black:
King f8; Defuser e8; Bombs a8, j8; Bishops d8, g8; Knights c8, h8; Rook
b8, i8; Pawn a7, b7, c7, d7, e7, f7, g7, h7, i7, j7.
The lower-right square is black in this variant to keep the inner setup the same as normal chess (King on opposing colour, etc.).
The object of the game is to checkmate the enemy King.
Piece Movement
The King, Bishop, Knight, and Rook are as in regular chess.
The Bomb moves one or two squares in any direction (non-leaping).
It can be exploded as a turn, in which case it takes out the first piece
in its path in all orthogonal directions (vertically and horizontally,
like a Rook). (I considered extending this to the end of the board, wiping
everything out, but it may be too much due to the potential harm to its
own army, especially if detonated on its starting square!) If an opposing
piece other than the Defuser tries to defuse the Bomb, it explodes and
the piece is annihilated, as well as the pieces caught by the normal explosion.
The Bomb cannot capture except by exploding.
If a Bomb's potential explosion could wipe out the King, it is considered
check and it must be tended to. Either someone must take the heat or the
King must move. (Remember, capturing the Bomb detonates it unless the Defuser
is the piece capturing.) This is a good way to catch the opposing Defuser
(in a fork). (NOTE: This is NOT check if the explosion would wipe out your
own King.)
Bomb explosions are recursive, so if an exploding Bomb hits another Bomb,
it also explodes (very useful if an opposing Bomb), causing its own wave
of fire in the remaining three directions. That is, a Bomb on h5 would
explode as usual. A Bomb on h7, being detonated by the wave of fire, explodes
upwards (to h8) and horizontally (not downwards beyond the original Bomb).
Thus, one column (h) and two rows (5, 7) are affected in this example.
This is a sneaky way to cause check: if a Bomb on g6 explodes, affecting
a Bomb on e6, that Bomb could explode in the face of its own King on e10
if there's nothing in the way! Thus, such a situation would be check and
must be tended to like any other.
Bombs can only be defused by the Defusers (as the latter name implies).
Something of note: if a Bomb is detonated by your opponent, you still get
your move.
The Defuser was hired by each side because of two reasons.
- The Queen, being a proper lady, chose not to participate.
- The Defuser is the only piece that is able to defuse the Bombs.
The Defuser moves in any direction up to three spaces (non-leaping), slightly quicker than a Bomb. To defuse a Bomb, the Defuser captures it like any other piece. The opposing Bomb is them removed from the board without exploding. One must be careful with one's Defusers; if a Bomb explodes and wipes out the Defuser, you lose the ability to defuse a Bomb. Protect your Defusers!
Pawns move as normal, with a two-step option on the first move. En passent is possible. Pawns can promote to Knight, Bishop, Rook, or a non-royal King Battler, which moves like a Queen and can be represented by KB (or kb for Black). This latter promotion addresses one thing I've always found strange in chess: how could a male pawn become a female Queen? Therefore, I will not allow a sex change to take place in my variant.
Check and Checkmate
A King is in check either when it is attacked by an enemy piece or threatened by a Bomb (orthogonally). If the check cannot be alleviated, the game is won for the checking player.
One of course may not destroy one's own King, as that person would lose.
Castling
This is the same as in ordinary chess, except for the square references. The King moves from f1 to either d1 or h1, and the Rook on that side moves to the other side of the King.
Notation
Quite simple, actually. Pieces other than a Bomb simply move to or capture the square.
A Bomb move is similar to other pieces, except that it cannot capture. When a Bomb is detonated, it is said to capture the pieces that get annihilated. Thus, for a Bomb on b5, you may be able to write 1. Oxb5->a5, b7, f5, b2 (Bomb on b5 explodes, wiping out pieces on a5, b7, f5, and b2). If a wave of fire reaches the edge of the board without hitting anyone, that wave is ignored. A pretty useless Bomb detonation could be Oxb5, wiping itself, and nothing else, off the board.
When a piece captures a Bomb (exploding it), one writes, assuming a Knight, 1. ... Nxb5, O->b5, a5, b7, f5, b2.
If a Defuser removes a Bomb, is it simply a capture: 1. ... Dxb5.
Sample Problem
As this is new, I decided to come up with a problem to help you understand the game. It's a simple mate where one side (White) has a Bomb left.
In each case below, Black has just played 1. ... Ki8 to alleviate 1. Rj4+.
 White:
King h6; Bomb g7; Rook j4
Black:
King i8; Rook b8
White plays 2. Og8#. The Rook on b8 cannot remove the Bomb, so checkmate.
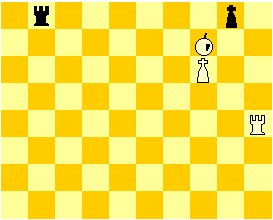 White:
King h6; Bomb h7; Rook j4
Black:
King i8; Rook b8
If White plays 2. Oh8, it causes a draw. Why? 2. ... Kxh8->h8, b8, h6 is forced, but the Bomb's explosion causes the explosion of its own King. As stated above, you cannot give check when such check would kill your own King. Therefore, as Black has no legal move, the game is drawn.
Strategy
If you line up the Bombs, there is the possibility that your opponent could sacrifice a piece in order to wipe out both Bombs, leaving his own two Bombs still in play. (Just keep clear of your Bombs in case this happens!)
Similarly, if your opponents moves about just right, you could set off both Bombs yourself in one turn and wipe out a huge chunk of the other army!
Remember that, while the Bomb can only move two spaces, the explosion goes to the first piece in each orthogonal direction, not beyond. (I'm not masochistic enough to create a horrific bloodbath! Besides, Bomberman's bombs stop when they reach a block, which dissolves.)
As in the above example, don't EVER place a Bomb such that it will attack your own King upon explosion. If a piece other than the Defuser threatens to detonate it, it is an indirect check that must be dealt with by moving either the King or the Bomb. Since it's check, castling out of check, as we know, is a no-no. Horrible!
Comments
I have kept this game as simple as humanely possible. I believe the Bomb adds a nice touch to the game, but it is important to protect your Defuser, as you are not allowed to make a new one out of your promoted pawns.
I have chosen to represent the Bomb by an O for three reasons
- That is what a Bomb looks like: a circular sphere.
- The second letter in Bomb is an O, and B is already in use (Bishop).
- The checker that can be used is a circular piece.
You may find it funny that the Bomb moves itself. However, carrying the Bombs are miserable men who are tired of how their lives are turning out and are willing to die in the war by annihilating themselves and others (kind of like what happens in those car and bus bombings in Jerusalem and elsewhere). Since their hands are full, these men cannot capture other pieces. But the Bomb is a shield; it cannot be penetrated, for the Bomb would be detonated. The Defuser is the only piece who can defuse the Bomb and reason with its carrier, convincing it to lead a better life. Of course, once counselled, it leaves the board to live that life. (OK, I'm a little iffy on how to say this part...) Of course, this paragraph has nothing to do with the game; I'm just providing a little background!
The Defuser is a member of the Secret Service called for this war to deal with Bomb threats. He is still able to capture other pieces as well, and is himself subject to capture. I chose to use the Defuser for two reasons:
- Even today, women are very few (if any) on the battlefield.
- I needed a special piece to defuse Bombs, for not everyone can do it (I can't!).
If you want to play a Bombless, Rookless game, use the normal setup and detonate all four Bombs on each of the first two turns. You'll only wipe out the a- and j-pawns and all of the Rooks. You are left with two open files, six main pieces, and eight pawns. The Defuser is now an ordinary piece with no special role.
If you would like to add any comments regarding notation, strategy, or otherwise (mostly notation!), or would like to suggest a variant of this idea, you are encouraged to contact me by email (click `Bryan Lambert' at the bottom of this webpage to obtain the email address; editor.) If I like your suggestion, I may implement it.
If you try this game out with a friend, let me know how it goes. Feel free to write out the game (read the Notation section carefully) and send it to me via E-mail.
Sample Game
This game is presented in conventional PGN format. The played moves are in bold.
As I have still not playtested this game against others, I have played both sides myself. This was a pretty good game. Enjoy!
1. f4 f5 2. g4 {In conventional chess (without the outside columns), this is the King's Gambit.} 2. ... fxg4 3. e4 {This is actually pretty rare in the conventional King's Gambit, but this is a variant of chess, so White attempts to dominate the center.} 3. ... Ng6 4. f5 Ne5 {Delaying 5. Bxg4.} 5. d4 Nc6 6. c3 Nd6 7. Bxg4 Bc4+ 8. Be2 Bxe2 9. Dxe2 a5 {Black starts to free one of his Bombs. Remember, Bombs can move one or two spaces in any direction, but cannot leap other pieces like the Knight.} 10. Be3 0-0 {Black has just made his own life difficult. The pawn on i7 is now pinned to the Bomb, as moving the pawn allows Bxj8, whereas the explosion takes out the castled King. Yes, castling can be dangerous for the castler sometimes!} 11. Ng3 b5 12. i3 Oa7 13. Nd3 e6 14. 0-0 exf5 15. Nxf5 Nxf5 16. exf5 {The Black Defuser is staring at the White Bishop. Of course, it cannot take the bishop, as it is limited to three squares per move. Besides, the White Defuser is behind it!} 16. ... Oi8 {Relieving the pin on i7.} 17. Oh3 Rf8 {This game is starting to get difficult for Black. He has his King boxed in on the side where a White Bishop is staring at a spot near him, and he has made poor development.} 18. Rbf1 g6 19. d5 Ne5 20. Nxe5 Dxe5 {Remember, the Defuser moves up to three spaces.} 21. fxg6 {This definitely puts Black in serious trouble. The pawn on h7 is pinned to the King because of the Bomb sitting on h3.} 21. ... Rxf1 22. gxh7+ {Remember, Black must prevent the attack to the Bomb on i8. His move is forced.} 22. ... Oj8 23. Bxi7+! {Black must capture the Bishop, and 24. Dxe5 is devastating.} 23. ... Kxi7 24. Dxe5 Rxg1+ {Trying to make the best of a lost position.} 25. Oxa1->a2, g1 {This stands for Bomb at a1 explodes, destroying the pawn at a2 (a White pawn) and the Rook at g1 (the checking Black Rook). White has many threats. It is impossible for Black to meet each one at once.} 25. ... c6 {This took me a long time to decide on. Any threat-preventing move falls to another threat, where material is lost.} 26. h8=KB+ Oxj8->f8, j7 {Bomb at j8 detonates, taking out the pawn on j7 and the newly promoted King Battler on f8. Black really has no choice. 26. ... Ki6 27. Dh5#.} 27. Df4+ Kj7 28. Oi4 d6! {Talk about a saving grace! Now the Bomb on a7 will, upon detonation, affect the entire seventh rank. If the Defuser moves to that rank, he's toast. So, White must try other plans.} 29. dxc6 Rc8 {This is necessary so the pawn can be captured rather than inflamed, the latter wasting the Bomb and allowing mate.} 30. Dg4+ {White tries to find a way to checkmate without setting foot on the seventh rank.} 30. ... Kj8 {30. ... Kj6 31. Di6#.} 31. Oj5+ Ki7 32. Di4+ Kh6 33. Oh5+ Kg7 34. Di5+ Kf7 35. Di7+ Ke6 36. Di6+ Bf6 37. j4 {Black has barely escaped (again). White now tries to create another piece to use.} 37. ... Oc5 {This is a tough choice for White. Should Black be allowed to detonate the White Bomb?} 38. Of5! {Again, a vital move. If Black detonates both Bombs, he exposes his King to check by the Defuser.} 38. ... Rf8 {Else 39. Dxf6#.} 39. Dg4 Ke7 {Black truly is stuck. I can't find a good move for him!} 40. Od7+! {This is truly fantastic. The Bomb, as stated earlier, is untakable (even more so because of the Defuser a short distance away). The King is restricted to the eighth rank now. In fact, it's mate in two!} 40. ... Ke8 41. De6+ {41. De4+? Oe5 is more difficult.} 41. ... Be7 42. Dxe7#.
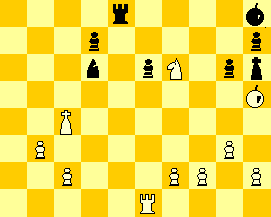
Final position:
 White:
King h1; Defuser e7; Bomb d7; Pawns b2, c3, c6, h2, i3, j4
Black:
King e8; Bomb c5; Rook f8; Pawns a5, b5, d6
Game 2
Bryan Lambert-Adam Dillon
April 26-27, 1999
First known game of Bomberman Chess
other than the sample above.
1. f4 Nd6 2. e4 Ng6 3. f5 Nf4 4. Bf3 f6 5. Nd3 {This gives Black a chance to start something, as my a-pawn is technically undefended (a Bomb blast would remove my Rook).} 5. ... Bxa2 6. Nxf4 Bxb1 7. Dxb1 (IÕm NOT using my Bomb this early...} 7. ... g5 8. fxg6 e.p. (I asked Adam at this point whether he knew about en passent. He said that he never knew it existed, even in real chess. He thanked me by giving me another pawn!} 8. ... h5 9. Bxh5 i6 10. g7+! {IÕm proud of this move. I get his Defuser, and my Bombs are no longer defusable.} 10. ... Kxg7 11. Bxe8 Nxe4 12. Ng3? Nxd2+ {I am caught playing carelessly. 12. De1 may have been better.} 13. Ke2 Nxb1 14. Bd4 Rxe8 15. Bxa7 {I know, I should have played this last move...} 15. ... e5 {Oblivious to the impending danger, Black plods onward.} 16. Be3! {Another threat. Now, if White were to detonate his Bomb on a1, it would detonate the a8-Bomb (explosions are recursive) and take out the Black Rook on b8.} 16. ... exf4 {Black plods forward...} 17. Oxa1->(b1),(a8->[b8]) {This means what I said at WhiteÕs last move, except it also takes out the Black Knight at b1. IÕve pulled my hair out working on notation for Bomb blasts; this is my best effort.} 17. ... fxe3 18. Nf5+ Kg6 19. Nxe3 {Pinning my own Knight, but protected passed pawns are very dangerous.} 19. ... b5 20. Kd2 c5 21. Rf1 c4 22. b3 c3+ {Black doesnÕt give up!} 23. Kxc3 b4+ {Another one?} 24. Kxb4 Be7+ 25. Kc3 Rf8 26. Nd5 Bc5 27. Kc4 Bd6 28. Nf4+ Kh7 29. i3 {White finally starts to extricate his remaining Bomb.} 29. ... Re8 30. Oh3+ {Is this the beginning of the end for Black? We had to adjourn at this point, so we agreed to pick up the game the following morning. It lasted only two more moves each.} 30. ... Ki7 {Weak, in my opinion. 30. ... Ki8 gives Black time to reorganize.} 31. Ng6+ Kj6? {31. ... Ki8, again, leaves Black at least a little hope...now itÕs mate in one move.} 32. Bj5# {Remember, Bombs can only be captured by the Defusers. Therefore, the position is checkmate.}
 White:
King c4; Bomb j5; Rook f1; Knight g6; Pawns b3, c2, g2, h2, i3, j2
Black:
King j6; Bomb j8; Rook e8; Bishop d6; Pawns d6, f5, i5, j6
As you can see, material ended up almost even...a nice game despite the occasional blunder...
Play It!
Use Zillions of Games to play this game! If you have Zillions of Games installed, you can download this game and play it.
Written by Bryan Lambert. Editorial comment by Hans Bodlaender.
This variant is an entry in the 1999 Large Variant contest.
WWW page created: April 27, 1999. Last modified: September 30, 2002.